Due to an uncooperative camera, poor lighting, and batteries running out of juice, and a frazzled cook, there will only be a few photos accompanying this recipe. And unfortunately, this in not one of those “carved in stone” recipes, but one of those “wing-and-a-prayer, this is how I did it this time” recipes. Every time it’s made, it’s made slightly differently, and it’s assumed you will adjust things for your taste.
That said, here’s the ingredients:
12 lbs. meat
6 cans condensed beef broth
water
1 1/4 cups balsamic vinegar (actually, I wanted to use 2 cups, but I ran out)
3 tbl. oregano
2 tbl. basil
7 bay leaves
black pepper
5 stalks of celery
8 lbs. potatoes
6 onions
10-12 carrots
2 bags frozen peas (use ‘petite peas’, not those starchy, over-grown pasty things)
5 cups water
2 1/2 cups flour
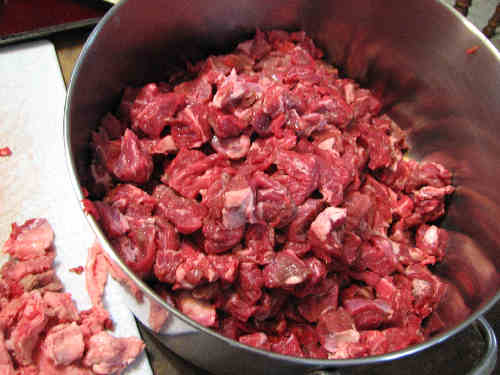
Chop the meat up into ‘stew-sized’ pieces, and put in a big pot (mine is 3 gallons).
Dump in the cans of condensed broth, the balsamic vinegar, and water. I think I used about one can of water for every can of broth, but I’m not 100% sure. The liquid should generously cover the meat. Chop and add the celery. Season the mix.
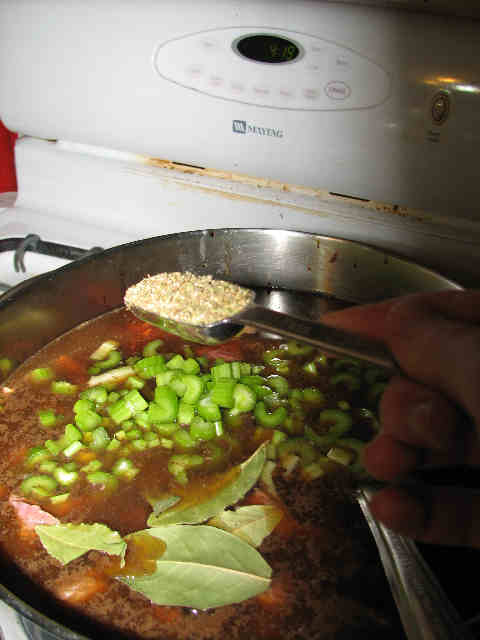
Bring to a boil, and then turn down the heat to a simmer (gentle bubbling around the edges of the pot). Let simmer for about an hour. Meanwhile, prepare your potatoes. Some people like to peel them; I tend to prefer to just wash them. In either case, they need to be chopped up into stew sized pieces. (Though a note on un-peeled potatoes: if they are not thoroughly cooked, the peels can still taste “like dirt”. This off-taste disappears completely if the potatoes are cooked enough.) Add the potatoes to the pot 1 to 1 1/2 hours before you want to serve the stew. (The more stew you are making, the more time the potatoes will need to cook. So if you are significantly scaling down the recipe, you probably won’t need to cook them so long.) After you add the potatoes, again bring the pot to a boil, and reduce to a simmer.
Peel your carrots and chop your onions. Add them to the stew 15-20 minutes before you want to serve (10 minutes if you significantly scale back the recipe). I think this recipe doesn’t have enough carrots, but I like carrots. Most barbarians about don’t like them. So I put in this many, and then tell everyone at the table that if anyone doesn’t want their carrots to give them to me. This works out well; most everyone else winds up with less and I get as much as I want. But if you like carrots, you’ll want to scale up the carrot proportion. The timing for adding these carrots means they are done at “crisp-tender”–not crunchy like a raw carrot, but still with a good bite. If you like softer carrots, add them sooner.
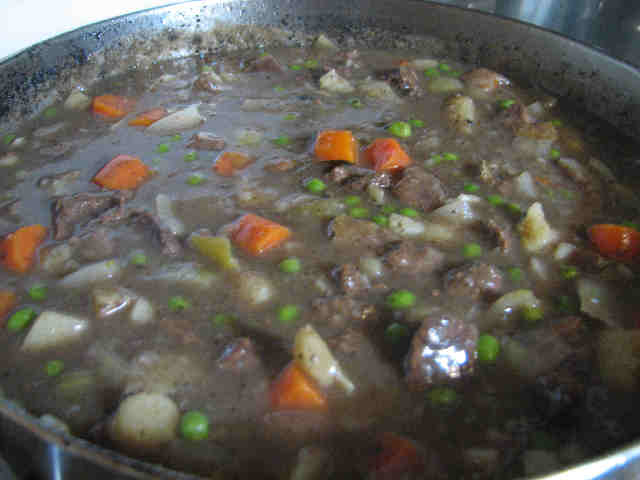
Right before you thicken the stew, add the peas. They don’t need to be cooked, just defrosted. You’ll know the stew is “done” by how cooked the potatoes are: they should no longer have sharp, defined corners from being chopped. They should be soft enough they are just beginning to round and smooth their edges.
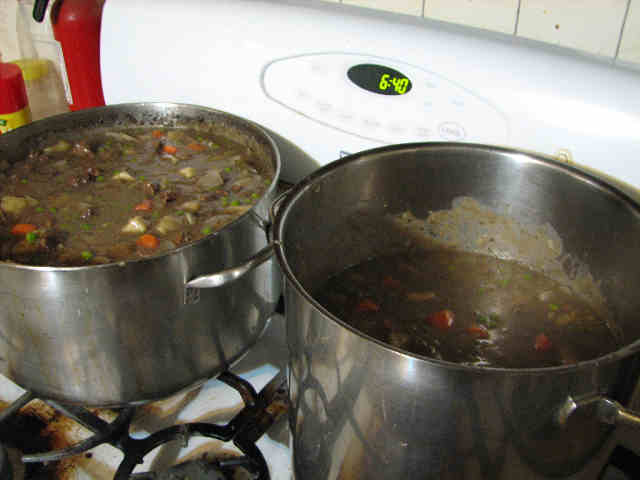
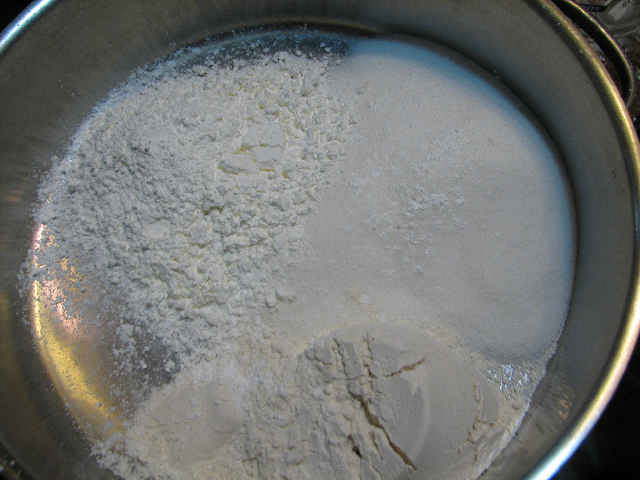
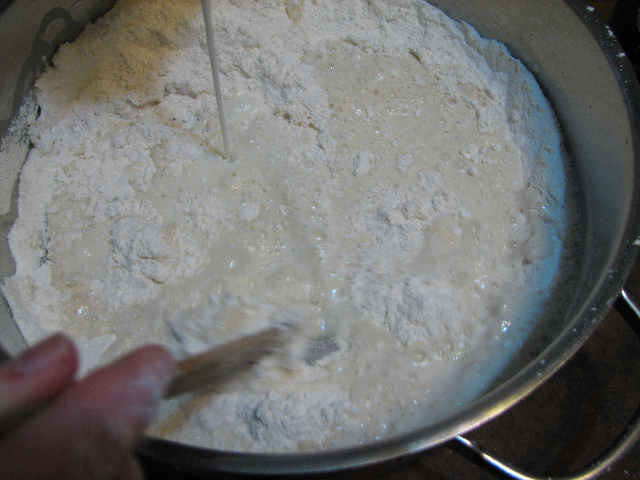
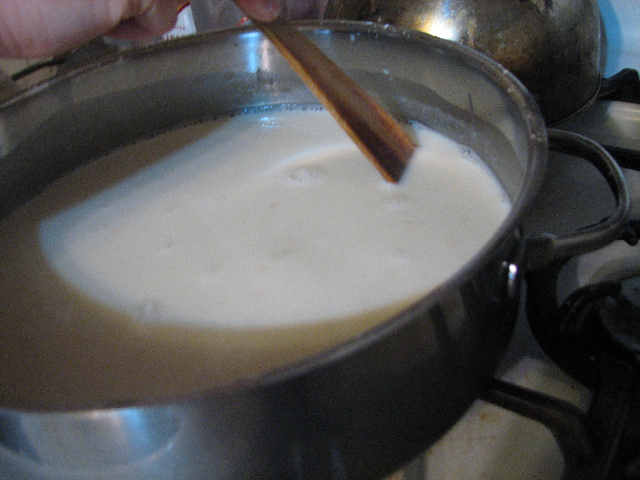
Lastly, you’ll need to thicken the stew with a flour and water mixture. I needed more pot space as soon as I started adding potatoes, so I split my stew up between my 3 gallon pot and my 2 gallon pot. I use 1/2 cup flour to 1 cup of water–3 cups of water and 1 1/2 cups of flour to one pot, and 2 cups of water and 1 cup of flour to the other pot. Whisk your cold water and flour together, until there is no lumps, and then add to the hot stew. Stir until thick and hot.
Close up, it looks even better.
Serve with fresh, homemade bread.
Posted in Recipes | No Comments »
Also referred to, at least around here, as “Girlled Cheese Sandwiches”. It makes about as much sense; after all, I don’t cook them on a grill (I use a griddle), and, at least around here, they’re always made by girls.
Once upon a time, I got a subscription to Cook’s Illustrated. I think I was in my mid-teens. Anyway, I heard it was supposed to be a very technical magazine, which was why I was interested in it. (I’m one of those people who was utterly fascinated by getting chef textbooks out of the library, those books where they show you the proper way to use a knife and cut an onion.) I was utterly disappointed by the magazine. My memory says it was short on illustrations, 97% opinion, 2% keeping your eyes open while you worked and experimenting, and 1% technique. Well, thank you very much, I already had plenty of opinions, and didn’t see the need to pay that much for them. As for experimenting and keeping your eyes open, yes, it could be handy to have that work done for you already, as long as they were writing on a topic that was actually relevant to you. But, in that case, you’d usually already figured most of it out yourself.
The straw that broke the camel’s back was when they ran an article on the “best” way to make a grilled cheese sandwich, as though that was a great mystery. I’ve been making grilled cheese sandwiches for nearly as long as I can remember, and all the “wrong” ways were so absurd I’d never even tried making them that way. I read the article, thought “Duh! I’ve know all of this since I was 9 years old,” and canceled my subscription. I figured they ought to be handing out more insight than 9 year old, if they expected me to actually pay for it.
But, just in case they were right, and people really do want to be shown how to make grilled cheese sandwiches, I thought I’d do it properly. (But I didn’t just “discover” this method, and I make no claims it’s the “best” way. It’s just my version of common sense and good taste.)
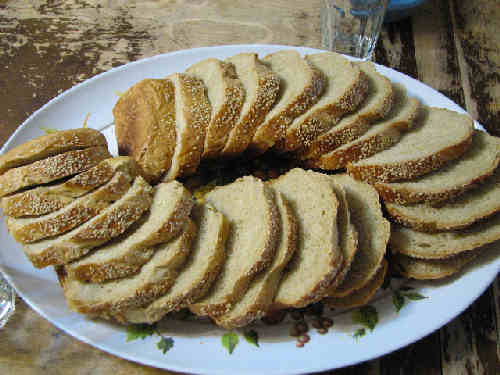
To make sandwiches, you first have to start with the bread. You can use anything you have laying around, like this:
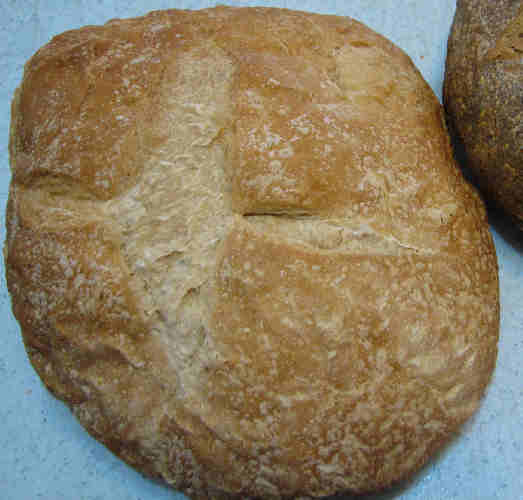
I made that bread a week ago, when cooking marinaded chicken. The bread used a starter, and long, cool raises, and then was baked on stones. I was quite impressed it hadn’t begun to mold or sour, and was only just beginning to dry out. I also used some loaf-bread I had made, ’cause this one loaf wasn’t enough. (I need to make three griddle fulls before everyone’s properly fed. This loaf made one griddle full.)
It should go with out saying that the better quality bread you use, the better your sandwich will be. Don’t think you can use some putty-like saw dust bread and get a good sandwich. Good bread makes good sandwiches, and bad bread makes bad sandwiches.
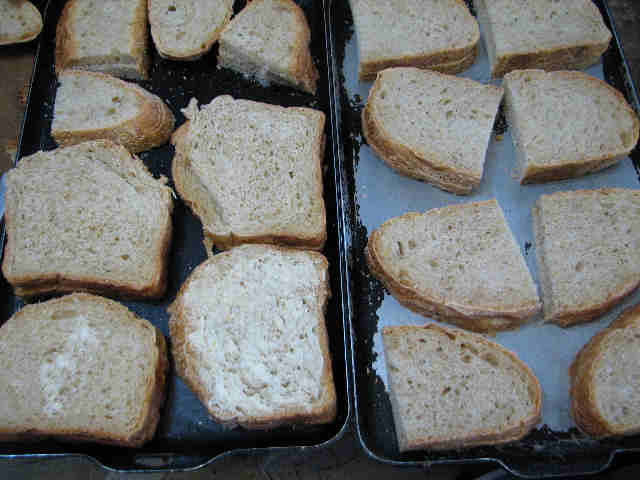
Slice your bread, assuming it isn’t a pre-sliced bread.

Arrange your bread in sandwiches on your griddle.
A good griddle is a thick griddle. They’re hard to find now; if you’ve still got your grandmother’s griddle, hang on to it. And don’t get suckered by claims of “non-stick”–I’ve yet to see a non-stick coating that didn’t come off the pan easier than the food came off the coating.
Butter your bread, every slice, the outside face only.
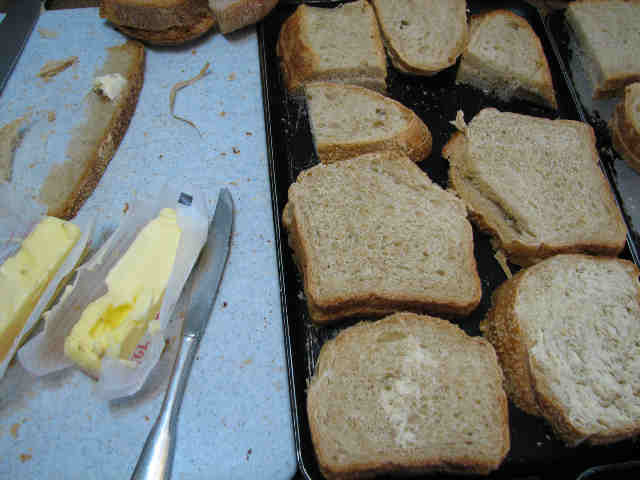
Use soft butter, or you’ll tear your bread. Anywhere the butter doesn’t touch won’t brown, but you don’t want to put the butter on too thick or you’ll wind up with a soggy, greasy sandwich.
Grate your cheese.
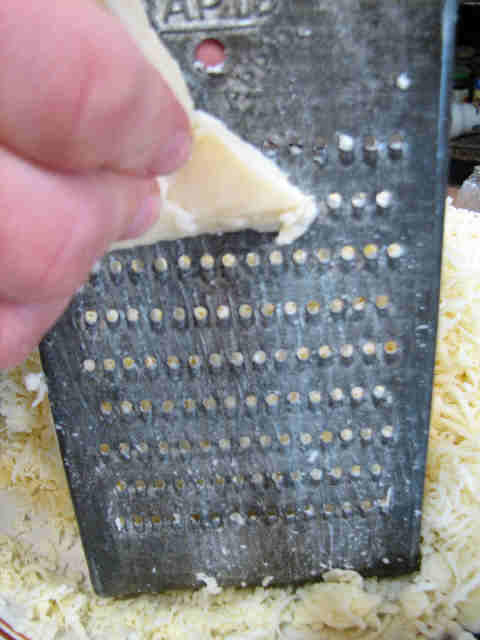
I got a minion to do this for me, so those aren’t my hands, in case you’re deathly curious.
I’m using swiss cheese, and a fine grater. The grater used to belong to a great-grandmother of mine, and they don’t make graters as sharp as they used to anymore. The finer you grate it, the easier it is to distribute evenly. Don’t go thinking you can just take out one of those plastic, square shaped slices and call it evenly distributed cheese–that stuff is pushing the boundaries of “edible”, and we’re talking about making food here. You can use any cheese you want, but it’s the same deal as the bread–the better the ingredients, the better the final product. If you don’t have to keep whacking people for trying to eat up all your cheese before you get it in the sandwiches and melted, you aren’t using good enough cheese.
Next, you add the cheese and seasonings to the bread.
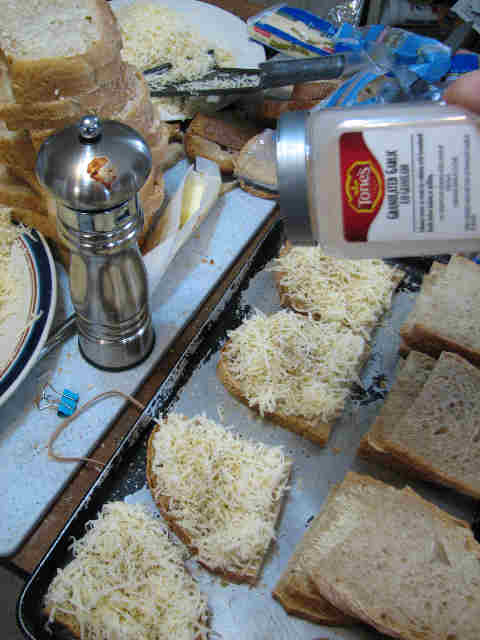
I’m using coarse ground black pepper and garlic powder. If you use muenster or mozzarella cheese, basil and oregano go great. Fresh rosemary would probably be good, too, but dried stuff is miserable. I used about 2 lbs. of cheese for 3 griddles of sandwiches. I open up half the sandwiches, put on the cheese and seasonings, and then close the sandwiches. Then I do the same for the second half. Arranging things on the griddle is really only important because I’m using homemade bread, which is slightly irregular, and you need to see how things fit together. If you were using very regular bread, you can just butter all the bread, lay down one layer, put on the cheese and seasonings, and then lay down the second layer.
Pop them on the stove, and turn on the heat.
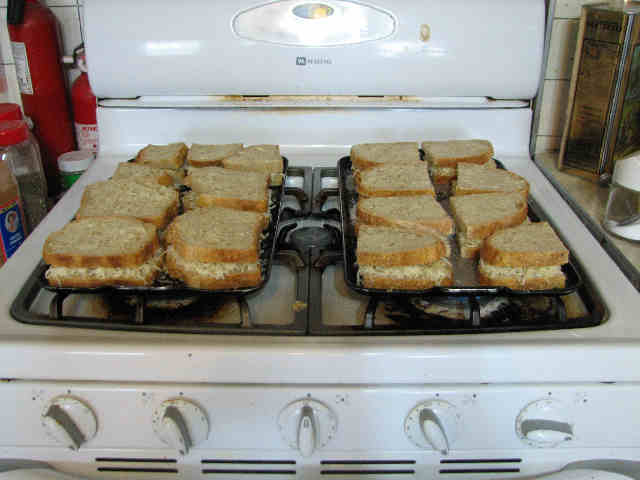
The heat needs to be at “medium”. With my old gas stove that had all the markings wore off, this meant until the flame burned straight up, with no curve, and was pure blue, with no streaks of orange. With my new gas stove, that means “medium” on the back burners, “low” on my hottest burner, and “medium low” on my medium burner. The flame matches the description of my old stove, so I think that must be a pretty accurate description of the temperature. But the point of the heat is get the sandwich to cook right–too hot, and it will burn around the edges, and maybe even cook the bread before the cheese melts. Too cool, and your bread will get soggy from melted butter, and the cheese will start melting out of the sandwich before the bread burns.
Check to see if they need to be flipped.
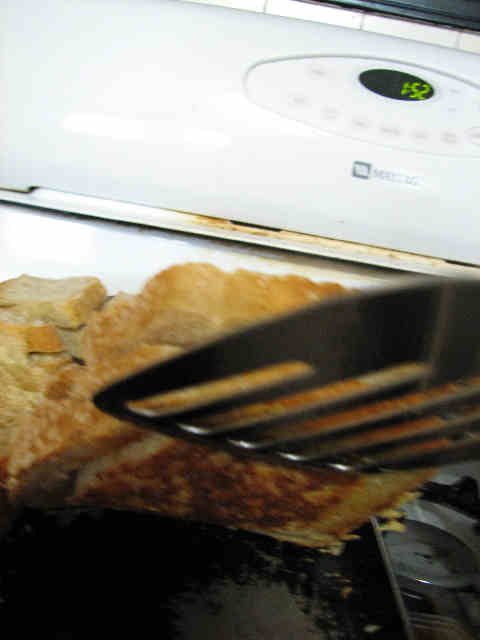
This is accomplished by sticking your spatula under a sandwich, and lifting it up for a peek. For best cooking, a sandwich should only be flipped once, so wait until the underside is dark golden brown before you flip anything. Once that side is fully cooked, you can flip everything over.
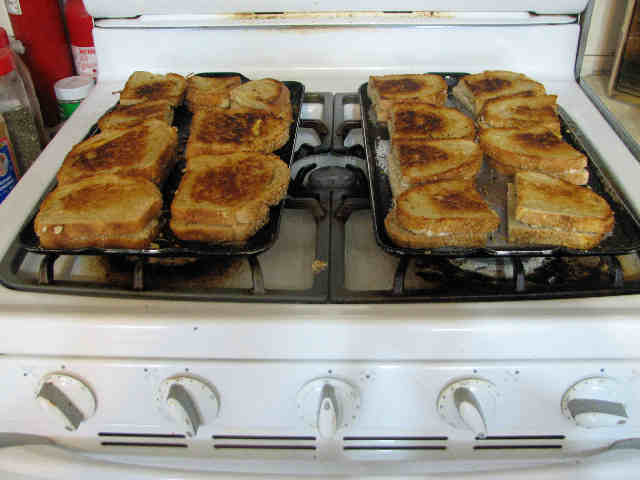
Look good, don’t they? Now you just need to wait until the second side cooks, but since the griddle has had plenty of time to get hot, it will be a much shorter wait. If you don’t keep an eye on them, they’ll burn.
Then they’re done, and ready to eat!
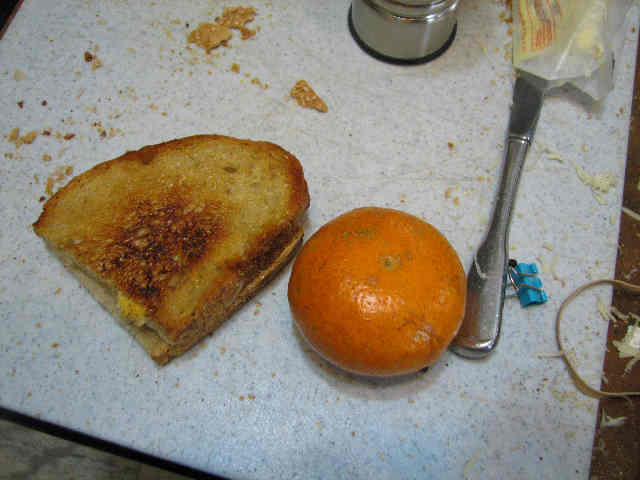
Since grilled cheese sandwiches are by nature high in fat content, it’s best if you can eat something a little acidic with it. I had a tangerine, but I bet the muenster/mozzarella sandwiches would be great dipped into a good tomato sauce.
Posted in Recipes | 1 Comment »
More gravy. When you need to really stretch the leftover’s from the night before, your choices are generally gravy or soup, and when your audience doesn’t really care for soup but does like gravy. . .well, you wind up making a lot of gravy. It effectively spreads out the protien without leaving people hungry.
The chicken in question is cooked in balsamic vinegar, garlic, rosemary, bay-leaf and lots and lots of mushrooms. Leftovers are scarce, because this is a popular meal. However, these leftovers do have flavor, and it merely needs to be encouraged. A faulty stretching of leftovers is one which dilutes the flavor as well as the main ingredients, producing an unsatisfying meal.
Once again, I start with a stick of butter and 1/2 cup flour. My liquid is one can concentrated chicken broth and two cans water. I slice the chicken and the mushrooms–the smaller the pieces the more even their distribution. I put dried rosemary leaves (not ground rosemary) and dried bay-leaves in a tea-cup. Ground rosemary tastes a lot worse than the whole leaves; I’m not sure why, but ground rosemary has a strong tendancy to taste like dirt. However, the whole leaves can feel quite pokey and prickly in the mouth. So I pour boiling water over them and let them steep a while, to soften them up and release the flavor.
After adding the chicken, herbs, and any leftover liquid from the night before, you’ll have to taste the gravy. I needed to add granulated garlic powder (real garlic in the butter would have been even better, but I forgot), and more balsamic vinegar. I also added more water to thin it out more.
I usually serve this over rice or egg noodles. My barbarians prefer Jasmine rice, so we make a big pot of it–5 cups of rice, and 7 1/2 cups of water. I put the rice and water in the pot, bring it to a boil, and then lower the heat as much as I can. I don’t remember the exact cooking time, but the rice is done when you tilt the pot and can no longer see any water in with the rice. Rice should be covered when it cooks, but not totally. If none of the steam can escape, the rice tends to be kind of soggy and mushy. We have a lid with a little hole right in the center, and that works well. But when I have to make a small amount, I just use a small saucepan and leave the lid slightly askew.
Posted in How to Stretch | No Comments »
You know what I mean by “Baked Chicken”. The chicken you ate last night drowned in ketchup or gravy. Usually it’s chicken breasts with some kind of breaded topping–crushed cornflakes, or seasoned bread crumbs. Now it’s the next day, and the chicken hasn’t gotten any more moist or flavorful. Now what?
Well, I make a meat gravy. I’m sorry for the unoriginality, but it’s just a really good way to use up leftover meat. Since this kind of chicken doesn’t have much flavor itself, I prefer to make a seasoned gravy.
I peel several cloves of garlic, and chop them up. I cook that in a stick of butter, and then add 1/2 cup flour and 1 TB. chicken boullien powder, and cook it till it’s brown and bubbly. Then I add one can of concentrated chicken broth, 2 cans of water, and one can of evaporated milk. That’s the basic gravy; you just have to stir and cook until thick.
Next you add your chosen seasonings. I used basil, oregano, black pepper, and granulated onion powder. I also used some grated parmesan cheese (maybe half a cup?). You have to be careful not to add too much, because it does make the gravy saltier. This is kind of what I call “Chicken Gravy, Italian Style.”
And then, of course, chop up the meat, stir it in, heat it through, and serve over mashed potatoes or toast. Warm, flavorful, and filling.
Posted in How to Stretch | No Comments »
There is a poor sprite that drifts about these walls. She is entirely ungrounded in logic, or reason, or reality, and one never knows quite exactly where she is. I’m not entirely sure she knows where she is. At any rate, I feel I am constantly saving her life, either by reminding her to eat, or to sleep, or to come in out of the cold, all things which she has a propensity to either forget, or not see the use of, or simply find unnecessary, or hadn’t quite gotten to yet (even if it is only 6 degrees F and dropping, and dark out). Today I once again saved her from near certain death.
She cooks dinner once every other week, and today conspired to make Black Beans and Turkey (except, with ground beef) and Rice. This is taking life in her own hands, because it not only has the dubious beans, but also rice and soy sauce, two things which the most barbaric barbarians regard as an abomination. One might almost think she meant it as an act of hostility toward them, but this betrays a misunderstanding of the sprite. She simply never considered reality, or facts, among which includes a particularly hibernative barbarian being dragged out of bed at the utterly unreasonable hour of 5 am, and forced into labor.
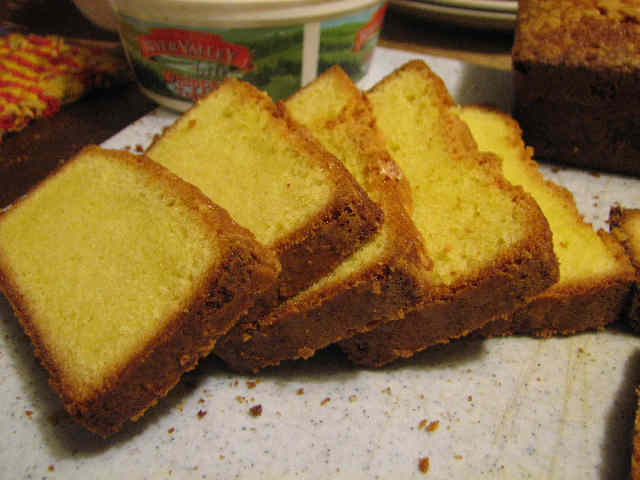
So, in order to save her life, and theirs, and possibly even mine (I sit next to them at the supper table), I went about concocting emergency rations. The wilde beastes would need taming tonight, and that means food, namely dessert. With whatever ingredients were on hand. I chose Pound Cake.
The popular barbaric assumption is that Pound Cake is titled as such because you pound the cake, or pound someone with the cake, or pound someone in order to keep the cake as your own. At any rate, something to with pounding things, preferably people. In reality, Pound Cake is named such because this old recipe has very scientific beginnings, in which a pound of sugar, a pound of butter, a pound of eggs, and a pound of flour were all combined together and crammed in the oven.
Today’s recipe has been monkeyed with, and no longer has such elegance of proportions, but it is still nothing like that farce in a box that proclaims it is mix for ‘Pound Cake’ and produces only a light, fluffy, white cake. Pound Cake is golden yellow, very heavy and fine, has a chewy crust, a pleasant egg-y flavor, and cannot come out of a box at all, when so much of it is eggs and butter. It is best served with fruit, but is still quite good without.
Just as the ingredient list comes first, it is also wisest to gather all your ingredients, so raid the cupboards and freezers. The act is generally known in the highfalutin’ cooking world as mise en place, and which I cannot help but transliterate to missing place, generally meaning “See what’s missing from its place, lest you find yourself half-way through and in need of a few eggs, necessitating calling upon your neighbors to see if they might have one to spare.” Even barbarians like having neighbors around every now and again, though taking a break half-way through a recipe to drive a couple miles off and back again for an egg is still not as smoothly as things are meant to progress.
Usually, when said highfalutin’ cooking world depicts mise en place, they show all these cute little bowls carefully arranged, neatly and artfully, in front of a white clothed chef with the expression of cat who’s just caught a canary. Though I am not highfalutin’, I am no less artful in my missing place.
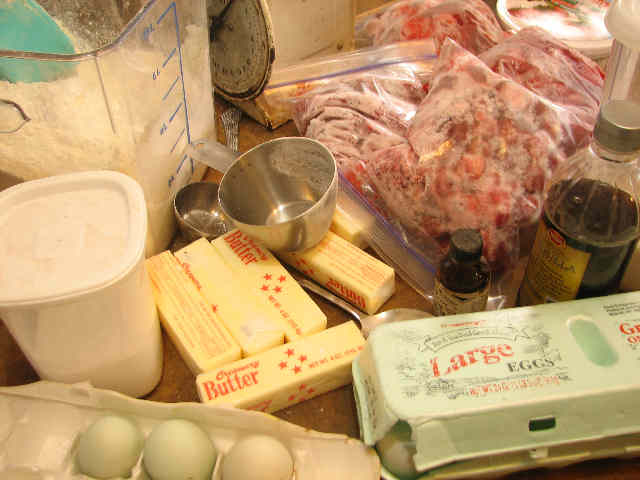
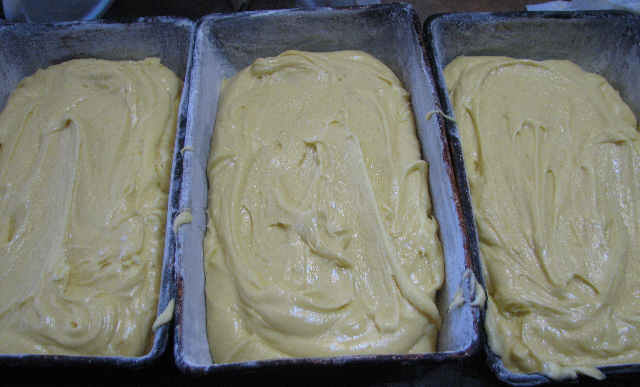
For 3 9″x5″ pans of Pound Cake, you will need:
6 sticks of butter
5 cups of sugar
15 eggs
6 cups of flour
1 tsp. salt
1 tsp. vanilla extract
2 tsp. lemon extract (or orange, or coconut)
Fruit of your choosing (I am using 16 cups of frozen strawberries, 8 cups sliced and 8 whole)
Preheat your oven to 325.
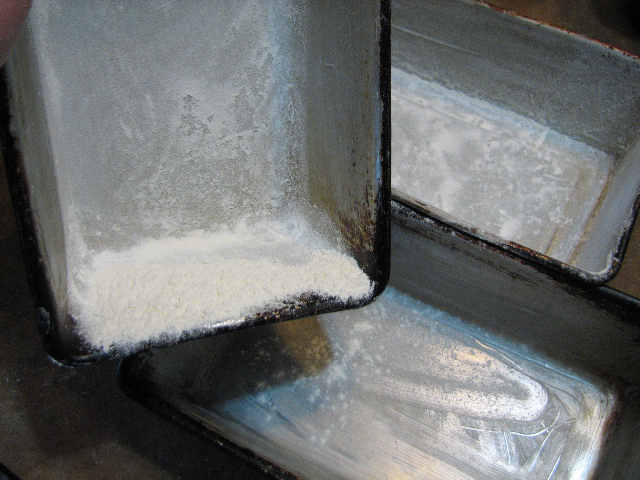
Butter three 9″x5″ baking pans. Don’t forget the corners and sides.
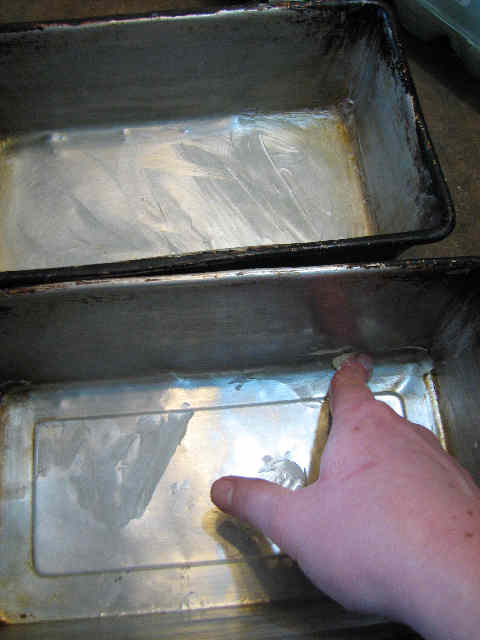
Flour them. I shake around the flour of one pan over the others, so any “spilled” flour can simply be used to flour the other pans.
And now, pray you have a mixer sufficient to the task. Meet my comrade in arms.
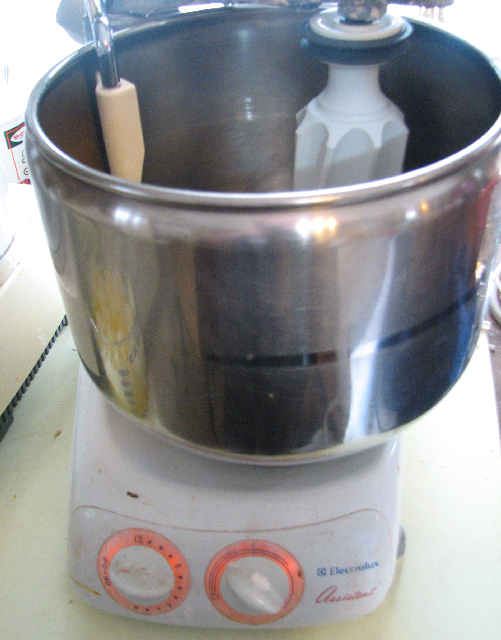
We don’t actually get along so well. I’m continually filling him to capacity, which he finds both uncomfortable and very difficult to manage. Meanwhile, I can’t stand his high-pitched grinding, especially since I already have to put up with so much other noise, high-pitched and otherwise. But for certain tasks, we declare a truce and generally work with each other. Pound Cake is one such task, and I would be loathe to be without him. (Don’t let my father hear I said that.)
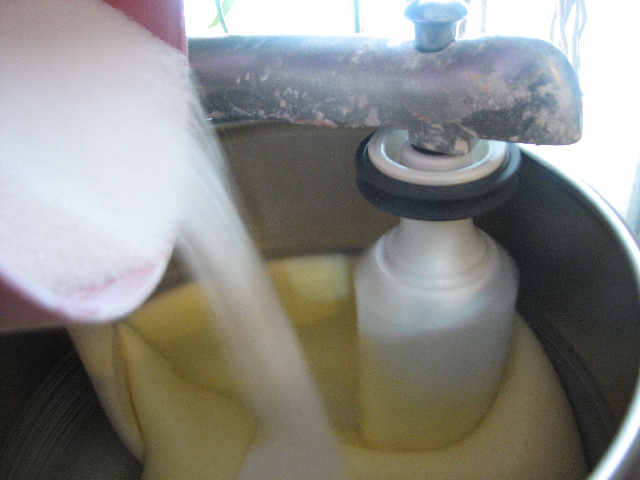
Since I pulled my butter straight from the deep freezer, it is, of course, rock hard. Or as rock hard as pure fat can be. I chop it into chunks with a bench knife and pile it into a microwaveable vessel, and play a game of luck and chance attempting to get it soft enough for the mixer to handle without melting it. I lost.
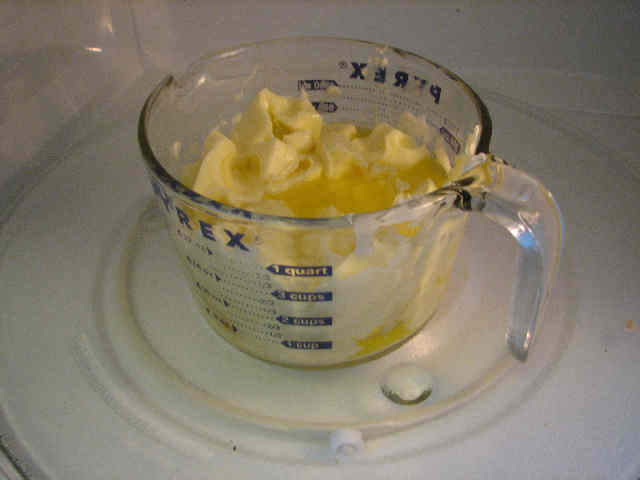
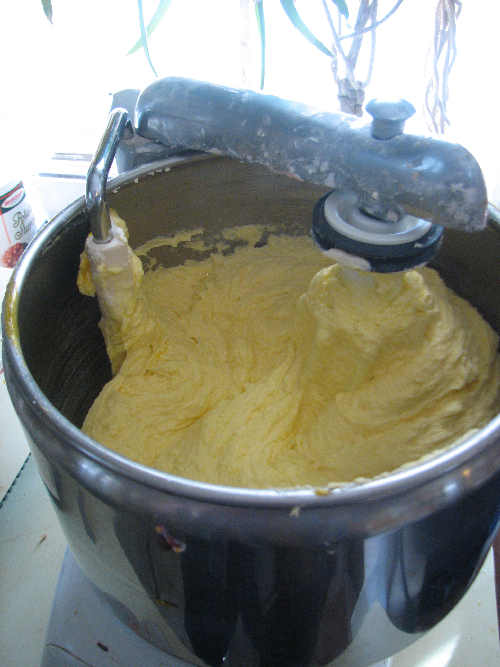
No matter, butter is butter, and it is still hard enough to cream. In goes the butter.
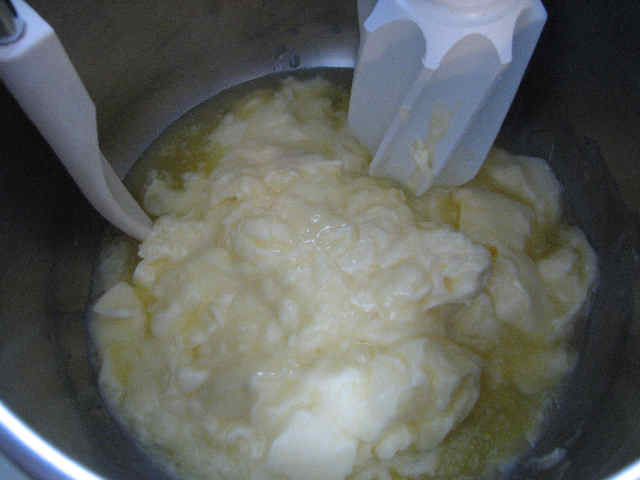
In goes the sugar (gradually).
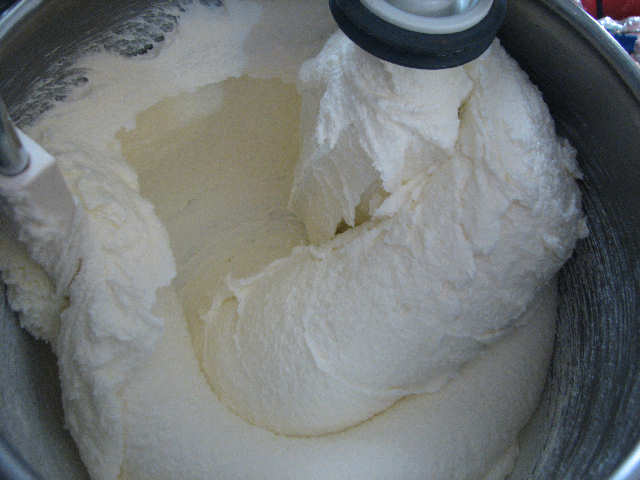
And the machine cheerfully creams it creamier than you’ve ever seen butter and sugar get creamed. It is very white, and very fluffy.
Next I begin to add the eggs, one by one. This is the part that makes mortal mixers cry like babies, because the mixture gets so thick. If you’re adding eggs while your mixer is running, be careful. I added one of my eggs rather carelessly, and shortly thereafter had to get out of the way as parts of egg yolk went flying.
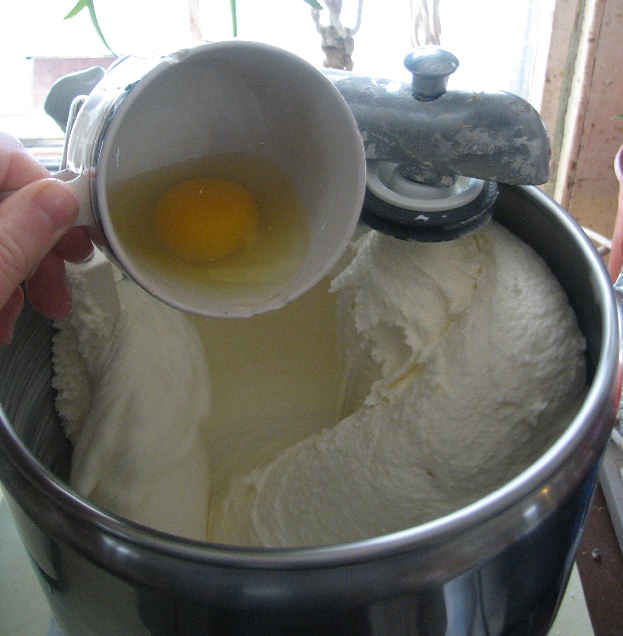
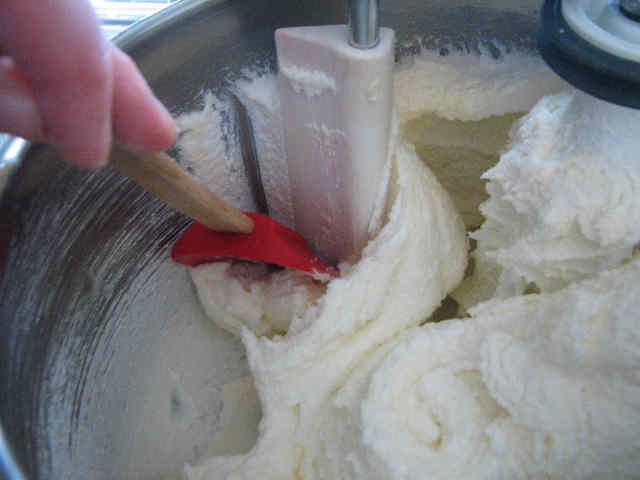
You may have to stop the mixer and scrape down the sides occasionally. Even my mixer misses some of the corners.
Having mixed in all the eggs, it still looks very fluffy, but is now a nice golden color.
I do not sift in the flour, but it is important to mix it as little as possible at this point. Up until you put the flour in, the more you mix it, the lighter the cake will be. After you add the flour, any amount of mixing will encourage gluten development, and a tough, chewy cake. Mix it until just barely incorporated. Though the batter has a lot of air mixed into it, it is very, very heavy. I’ve sent many a good mixer to an early death making Pound Cake.
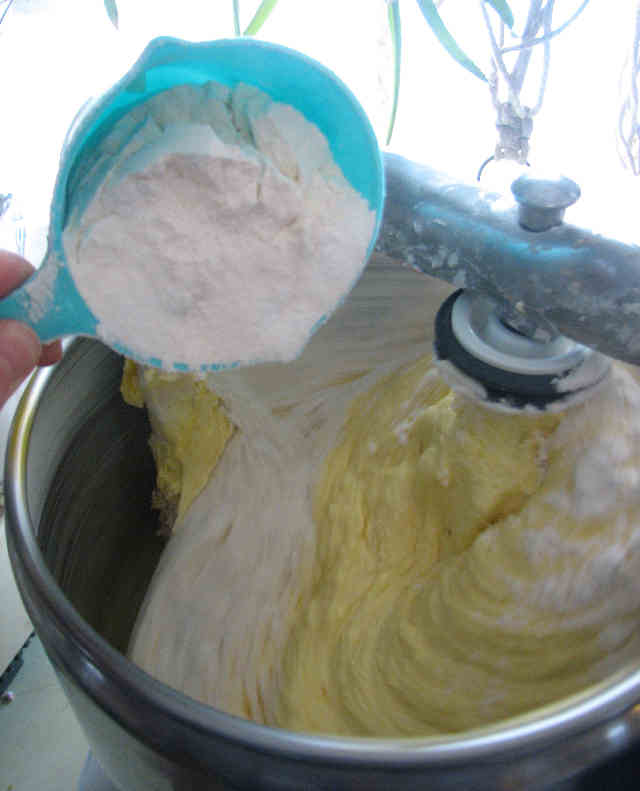
Add the salt and extracts, and again, mix as little as possible.
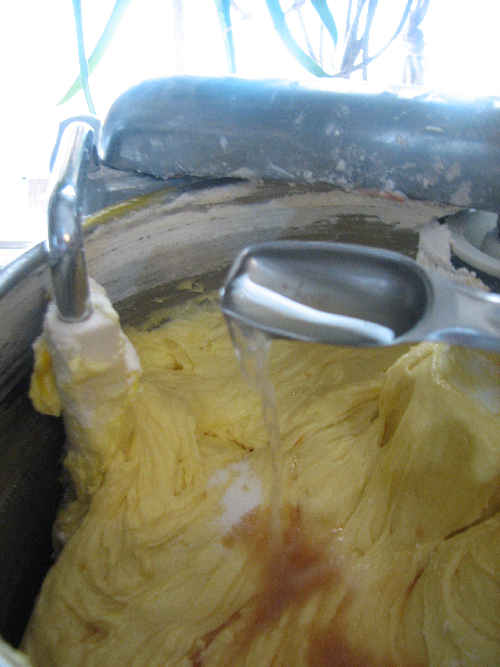
Dump it into the prepared pans.
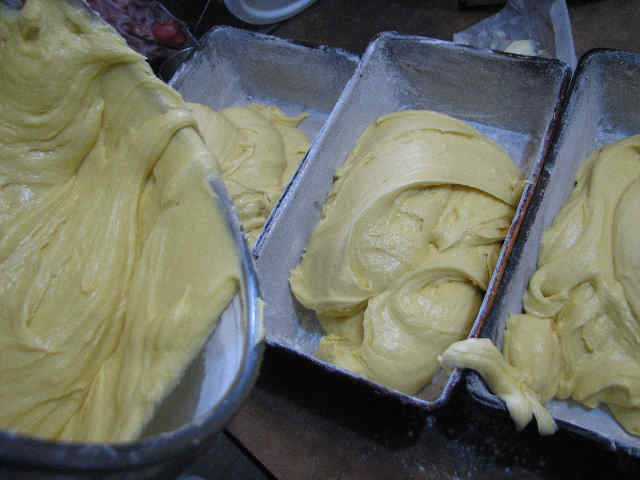
Smooth them off prettily, like you’ve just caught a canary. . .
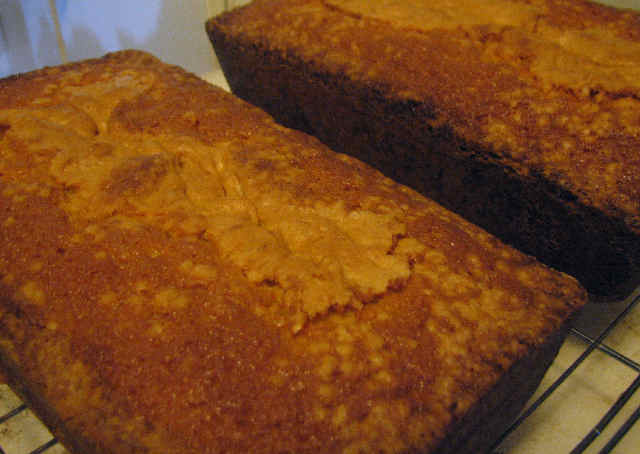
. . . and pop them in the oven for an hour and a half, or until a tooth pick inserted comes out clean. (If your oven runs hot, you’ll want to check them early.) They will be a deep golden brown on the top. Let them sit 5 minutes, and then turn them out on a rack to cool.
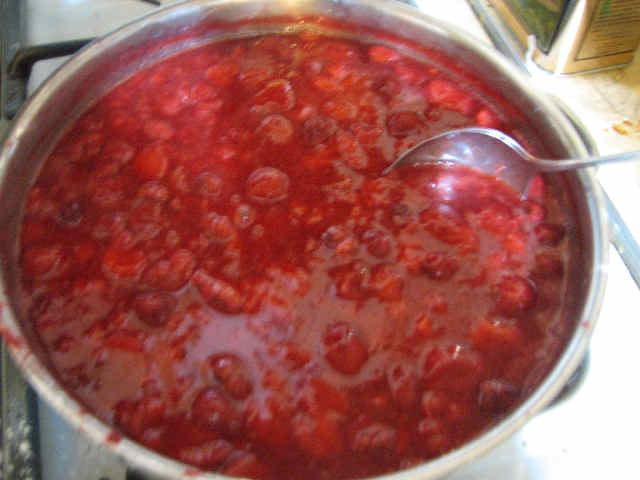
You can pop together the fruit sauce at the very last minute. I put my 4 bags (16 cups) of still mostly frozen berries in a pan, added 4 very generous soup-spoonfuls of cornstartch and one cup of sugar. I left it on low while I ate supper, but that hardly made a dent in it, so I turned the heat up to high, and kept stirring it. By the time the berries defrosted, the cornstarch and sugar had also thickened it.
Here’s what you have:
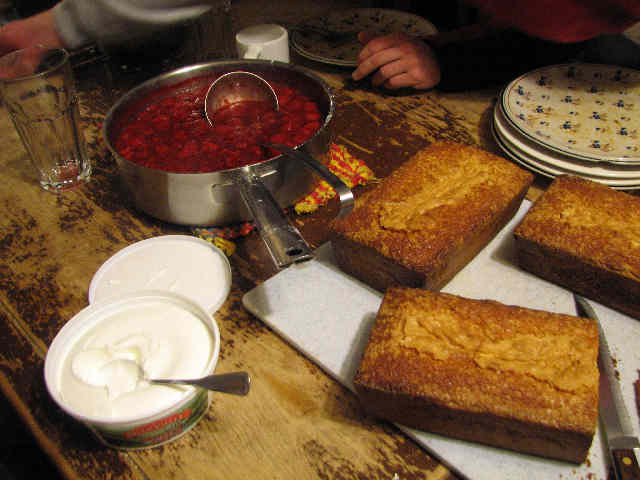
The original recipe says to “slice very thin”, which is of course a very funny joke. Take a nice slice,
put a generous ladleful of berries over it, add a dab of “whipped topping” (real whipped cream is of course much better, but generally not on hand during sudden emergencies), and enjoy.
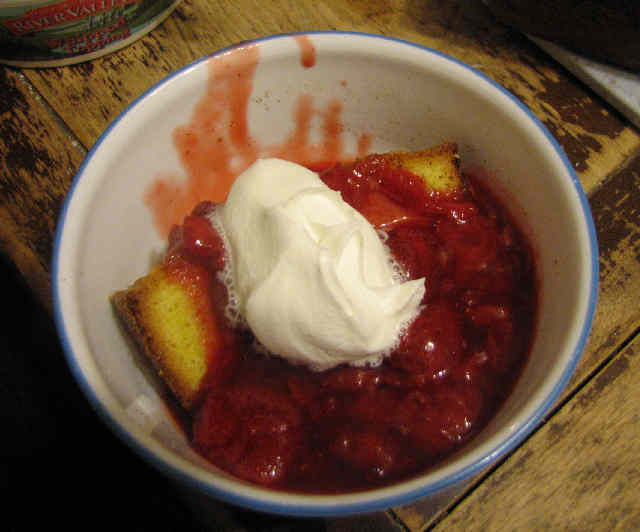
My barbarians rapidly devoured all the strawberries, and two of the pound cakes. The third pound cake made scanty leftovers the next day. The matriarch said she didn’t care for warm strawberries, which was generally dismissed as absurd by the rest of the barbarians. The patriarch was trying to watch his cholesterol, so he ate (and thoroughly enjoyed) his warm strawberries over torn up, fresh-baked bread.
Posted in Recipes | 1 Comment »
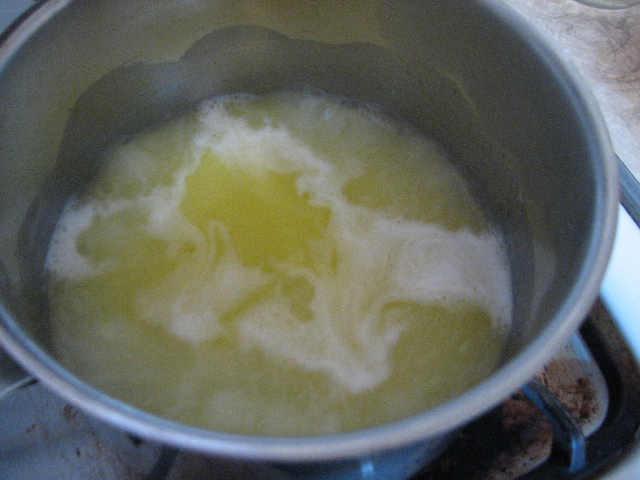
Last night we had corned beef for dinner, and we had a fair amount left over, but not overly much. I decided to make a gravy much along the lines of the old timer’s favorite, chipped beef on toast. After peeling 6 lbs. of potatoes with the two youngest barbarians, I started on the gravy.
I generally improvise my gravies, but a good rule of thumb is about 1 TB flour for every TB butter, and for every TB of butter, a 1/2 a cup of milk. Today, I used a stick of butter, a heaping half cup of flour, and somewhere over 5 cups of milk (I thinned out the gravy more after I added the meat; it looked to thick to my eye).
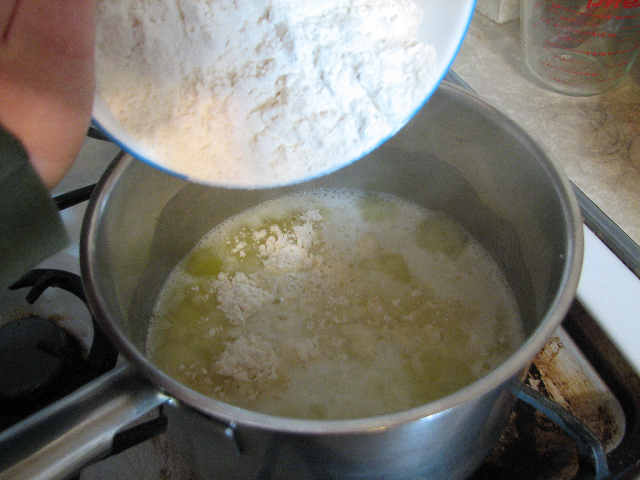
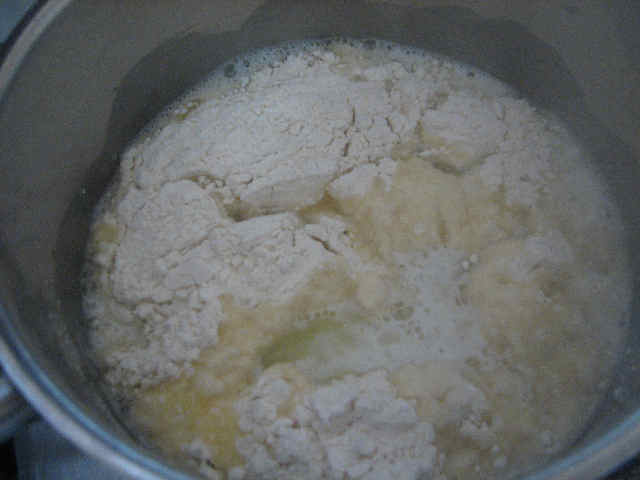
You melt the butter, add the flour, and cook until it’s bubbly and starting to brown. That’s technically called making a roux, but most people here can’t even pronounce that word, never mind know how to use it.
Next, you’re technically supposed to add the liquid (here, I used milk, but it can be broth) slowly, mixing well after each addition. We just dump all the liquid in at once. Since the flour has been coated with the butter, it won’t lump up. (It may seem so at first, because the butter will harden in the cold milk; but once the butter melts again, you’ll have a smooth thick sauce.)
Cook and stir until thick. If you sit there and babysit it, you can have the heat on high the whole way, but if you keep turning your back, doing other things, and generally not stirring constantly, you should have the heat on lower.
The corned beef gets trimed of excess fat, and cut into small pieces. Then it gets uncerimoniously dumped into the gravy. Because the corned beef is already so salty, I don’t make this gravy with broth, which usually has large amounts of salt itself. But I did add very generous amounts of freshly ground pepper.
When the potatoes are done cooking (I use a pressure cooker, 15 lbs. pressure, 2 cups of water, and 10 minutes cooking time after the weight begins to rattle. You can also just boil them, but I feel they’re more watery and flavorless that way.), they need to be mashed. Always add the butter first, or you will have very glue-y potatoes. I had my minion use a stick of butter. Mash the potatoes with the butter until you are satisfied with the lumps or lack thereof. Then splash in as much milk as you desire, and just briefly mash that in to mix. You can use salt (usually) or pepper (not so usually) as you desire, but in the case of this particular meal, I felt the corned beef supplied all the salt that was needed.
The resulting mess is a very good way to use up corned beef. The gravy is soothing and ever-so-slightly sweet, and counter-balances the salty meat. It is warm, it sticks to your ribs, it has sufficient amounts of protein and starch, and tastes good to boot. The youngest male barbarian made noises about how he thought leftover corn beef is better shredded and cooked in scrambled eggs, but he was quickly drowned out and shouted down by other barbarians who much preferred the gravy and potatoes to scrambled eggs.
If you don’t happen to have enough potatoes on hand, or perhaps don’t care for them, or the work, or the time, you can always use toast instead. This is generally frowned upon for two reasons by my barbarians. For one thing, the toast will get soggy, and that is gross. For the other thing, there is only one toaster, with only two slots, and many, many more barbarians.
Posted in How to Stretch | 2 Comments »
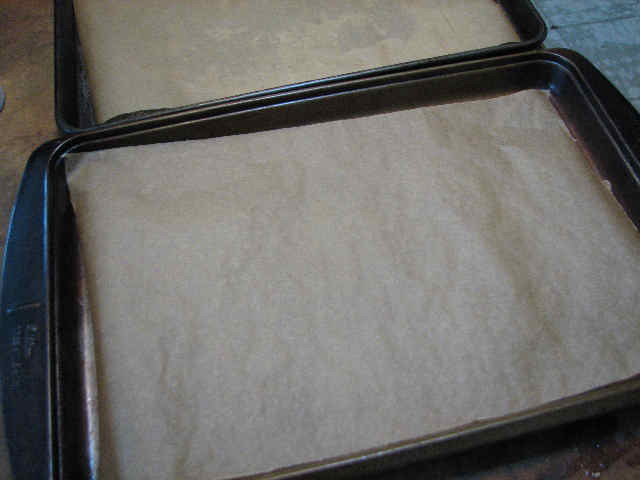
This recipe makes about 35 eclairs. For my audience, that means about two each, and everyone would have been more than glad to have more. Next time, maybe I will, because this recipe leaves you with 12 egg whites, which is only enough for one angel food cake. We really need two cakes to properly go around. Needless to say, this is a recipe I tend to make most often in when the spring chickens are putting out a dozen eggs a day. It’s all too easy to a get a gross of eggs sitting in the refrigerator if one doesn’t take drastic action such as this.
Pastry dough:
Line baking pans with parchment paper, and preheat oven to 425.
Ingredients:
2 cups water
2 sticks butter
1 tsp. salt
1 TB. sugar
2 cups flour
6 to 8 eggs
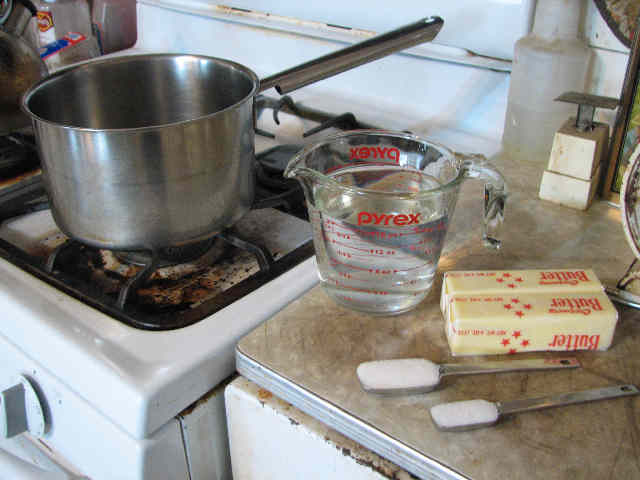
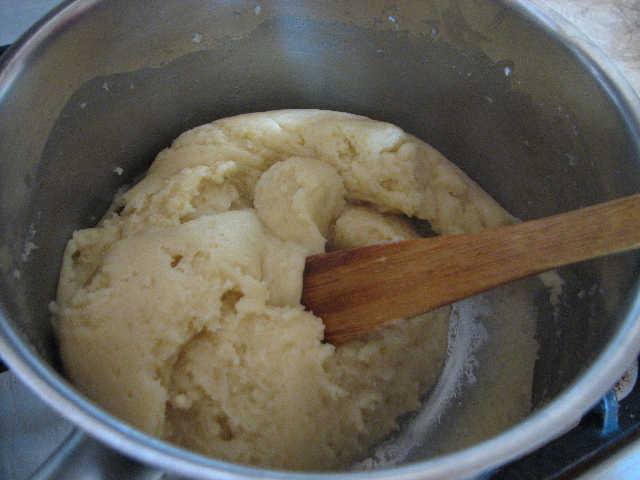
Bring the water, butter, salt and sugar to a rolling boil.
When it comes to a boil, turn off the heat, and dump in the flour all at once.
Stir hard for 30-60 seconds. At this point, it will sort of look like a stiff paper mache paste.
Return to heat, and cook, still stirring hard, for another 30 or so seconds. After this point, the original recipe recommends switching to a stand mixer with a paddle, or using a hand mixer. I continued to use my wooden stirring paddle, but it did give me a bit of a work out. It is very stiff, and kind of glossy. Start adding the eggs, one by one.
At first the mixture will separate and slip and slide; then it will join together and seem just as stiff as ever.
The original recipe said the mixture should be soft enough to slip off the paddle (I needed to use 7 or 8 eggs to get it that way), but I found I actually had an easier time forming the eclairs after the mixture had cooled to the point it was too stiff to slide off the paddle. You may want to stop at 6 eggs if you’re new to using a pastry bag.
Alas, I couldn’t take pictures and pipe the eclairs at the same time, and I didn’t have anyone taking pictures at the time. So some of these following photos are part of a mock-up. Here’s a quick crash course in pastry bags.
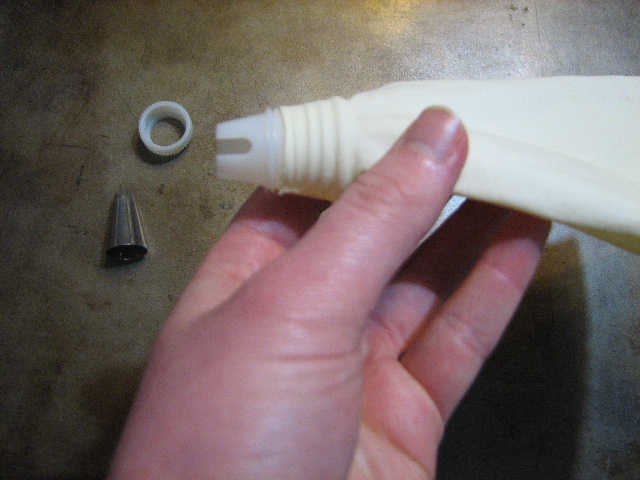
These are the components: pastry bag, the parts to the coupler, and a decorative tip. (The pastry bag shown is a small decorator bag. Sometimes I use that, and sometimes I use disposable pastry bags.)
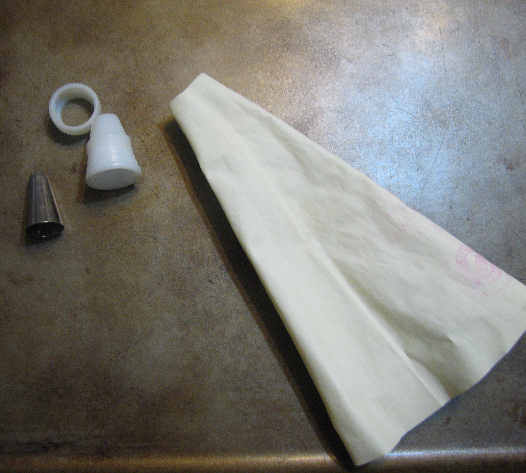
When I pipe the eclairs, I use my coupler with out any tip in it. This makes it easier to get an eclair the size I want it. I keep the notch in the coupler facing towards the baking sheet, to keep the eclairs more uniform. If you do use a tip, you rest the metal tip over the coupler, and then fasten it on with the coupler ring.
Fold back a cuff before you load the bag; it keeps the mess down, and the bag is easier to handle if it’s not slippery.
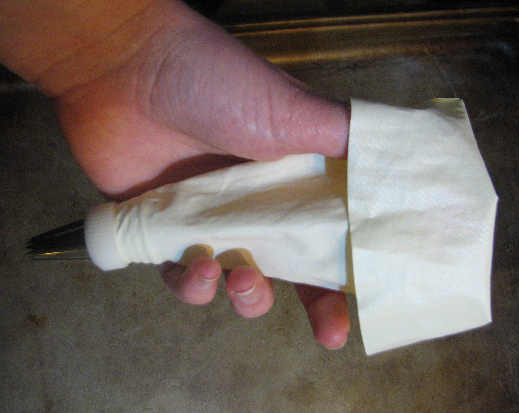
Also, folding down that cuff keeps you from loading the bag too high. That means you still have enough bag left to twist the end shut. If you don’t firmly twist the end shut then when you squeeze the bag it will backfire—major mess and no filling coming out the little tip like it’s supposed to.
The twist is held shut with the thumb and pointer; the rest of the fingers control the pressure on the bag.
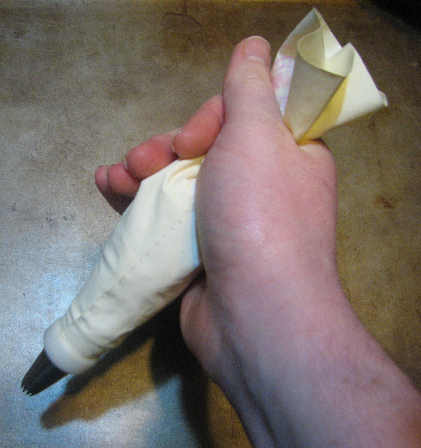
The other hand guides the tip.
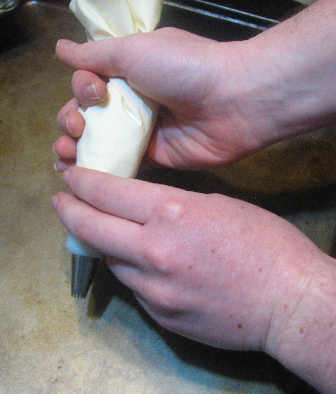
As you use up the filling, you will need to squeeze the last bits down, {the mess is do mostly to impatience; more on that in the assembly instructions}
and re-twist the bag.
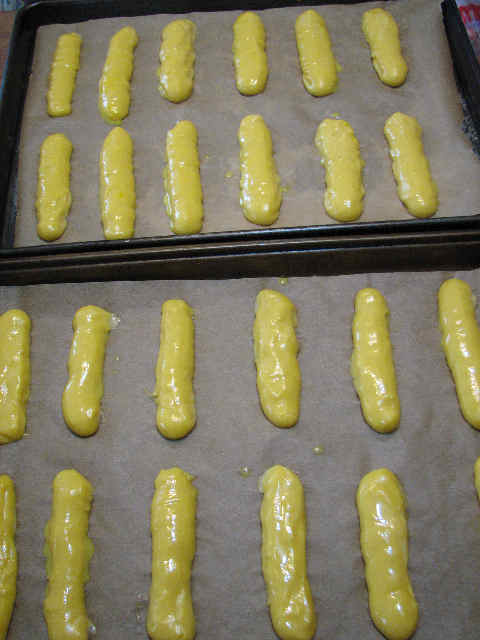
As for making the eclairs, you can really make them any shape or size you want. But they do puff up considerably in the oven. A general rule of thumb is that if you pipe out the filling the size of a hot-dog, you will wind up with an eclair the size of a hog-dog roll. You’ll need to move slowly and squeeze firmly.
Piped eclairs.
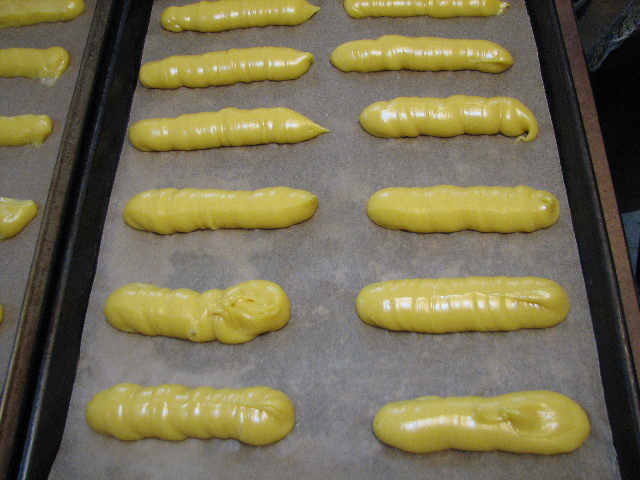
(I needed to use 3 pans, but it’s unwise to use more than 2 pans at a time in the oven. I piped the last pan after the first two came out, reusing the parchment. At that point, the dough was stiffer and easier to pipe. If you only used 6 eggs, you may find it too stiff to do it this way, and you may want to pipe all the eclairs at one time). At this point, you will probably have at least 6 people ask you why you are piping the filling before you bake the shells. Even if they asked you the same question last time you made them.
If your eclairs have funny lumps and bulges (mine? never!) they can be easily smoothed out with a wet finger. Don’t fret too much about it, though, because the puffing they do in the oven covers a multitude of sins.
Next use a pastry brush to brush all the piped elcairs with an egg mixed with 1/2 TB water. This give the elcairs a nice gloss, but doesn’t do much else. So it’s okay to forget or deliberately omit this step.
Bake in the pre-heated oven for 15 minutes, then reduce the heat to 375 for about another 25 minutes. When you reduce the heat, you should rotate the pans, top to bottom and left to right, but other than that, keep the oven closed. Steam is what makes the eclairs puff, and if you keep opening and closing the oven, you’ll wind up with flat eclairs.
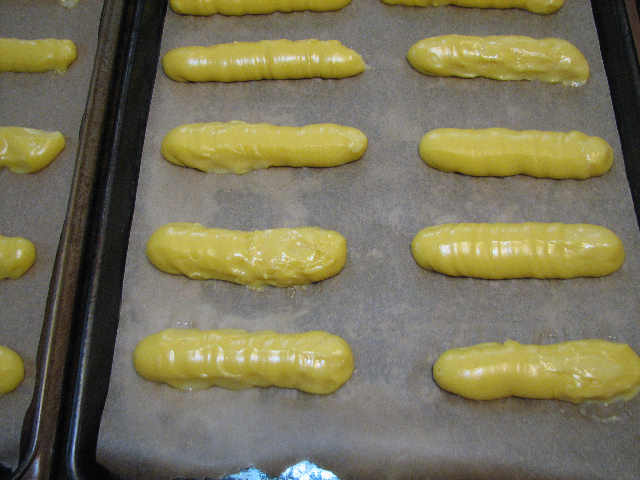
They should be a light golden brown when they’re finished. If you under-cook them, they’ll look great when you first take them out, but as they cool, they’ll deflate. They’ll be a little squishy or mushy, too, but you can make them work. If you over bake them, the can get a little burnt on the bottom. (And if you don’t rotate the pans, you’ll get one burnt pan and one mushy pan.) I’ve done both, and my advice is to err on the side of over baking. All the cream and chocolate pretty well drowns out a little over-browning on the bottom, but squishy, flat, eclairs are less appetizing (but still quite edible). This is a pretty good representation of their color when their done.
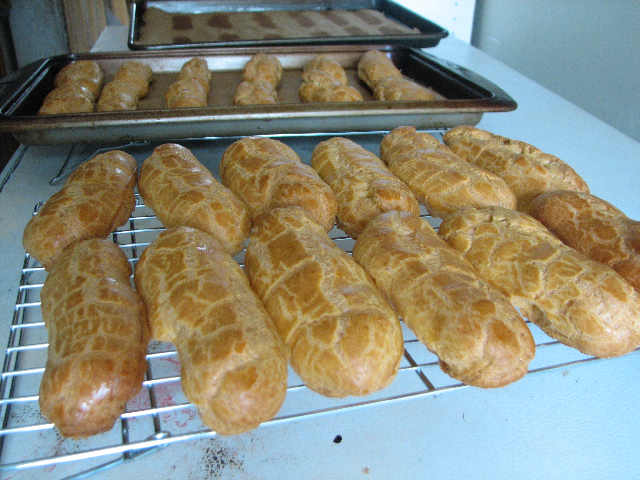
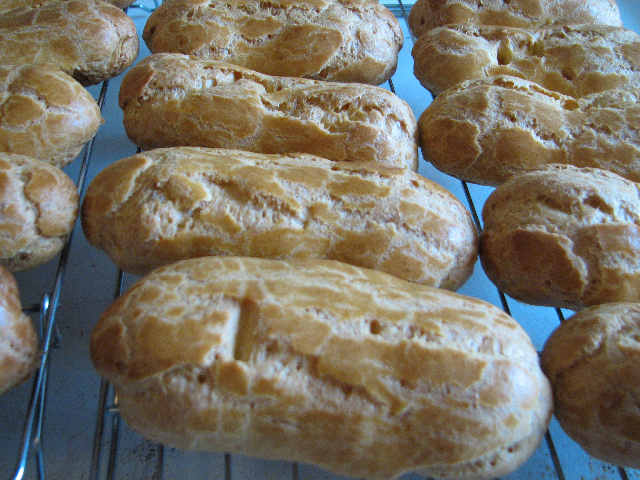
These shells came out perfect. . .
. . . but since no cooking session is complete without a minor disaster, I messed up a bit on the filling. Learn from my mistakes, and make the filling the day before—filling the eclairs is much less than pleasant if your filling isn’t 100% chilled. If you made the shells early in the morning, and got right on the filling, you can still do it all in one day. If you do like what I did—namely, get distracted reading Howl’s Moving Castle until 11:30 am, and not even get started on the filling till mid-afternoon—well, you’ll be filling eclairs at 8 pm with filling that’s not properly set, and a horde of hungry barbarians standing over your shoulder.
Filling:
6 cups milk
2 vanilla beans or else vanilla extract.
1 1/2 cups sugar
1 cup + 2 TB flour
3/4 cup cornstarch
12 egg yolks
6 TB butter
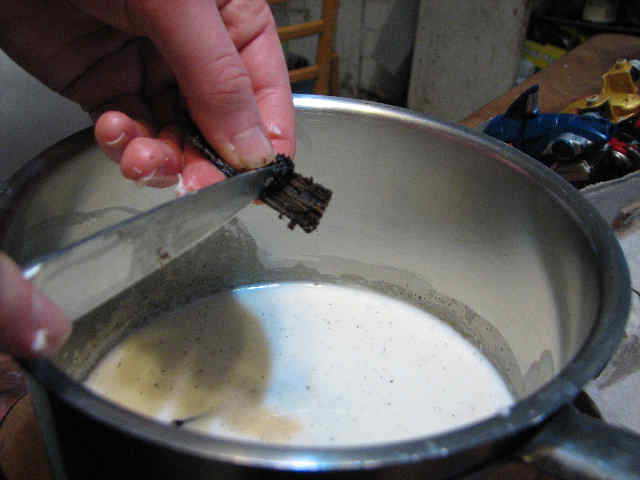
This is an adapted filling recipe; the original didn’t call for any type of vanilla. Usually I just use real vanilla extract in my baking, but since The Cheese Trap had some in that week, I decided to try real beans for once. (It was a $4 for 2 beans, much less expensive than Wegman’s was carrying them for. The Cheese Trap is sort of a general store/co-op sort of place. I know they buy their stuff from co-ops, and then re-package to sell.) Since the recipe doesn’t originally call for vanilla of any type, I don’t know how much extract to recommend. I tried using only one vanilla bean, and found it had too mild of a flavor for me, so I wound up using two.
I cut the beans into thirds, and let them steep in 1 cup warm milk until the beans were soft. (Bring the milk and beans to a boil, then turn off heat and let sit 15 minutes.) Then I scraped out the seeds, and let the whole thing steep longer. It’s supposed to be enough to just steep them in warm milk, but if I used beans again, I would make the custard the day before, and leave the beans sitting in the custard till I needed it. They’re easy to pick out, and will keep giving off flavor as long as they’re sitting it.
[Note on vanilla flavors: I cannot stand fake vanilla extract–it tastes so very fake to me, like some “vanilla-scented” toy I used to have as a kid, not like anything actually meant for eating. What I found interesting is that the vanilla beans smell more like fake vanilla extract than real vanilla extract. As far as taste, the beans seem to straddle the difference between fake and real vanilla extract. Real extract tastes more “brown”, deeper and more of a dried taste (as a prune is more dried and concentrated than a plumb). However, the fake vanilla extract is too fake–too sweet, too sickly, and too overpowering. The real vanilla bean still carries some of the fruitiness the fake extract imitates, but is more mellow and full flavored than the fake extract. I still recommend real vanilla extract over fake vanilla extract, but if you want a real vanilla flavor, the beans are best. However, most people probably won’t even notice a difference unless you grill them.]
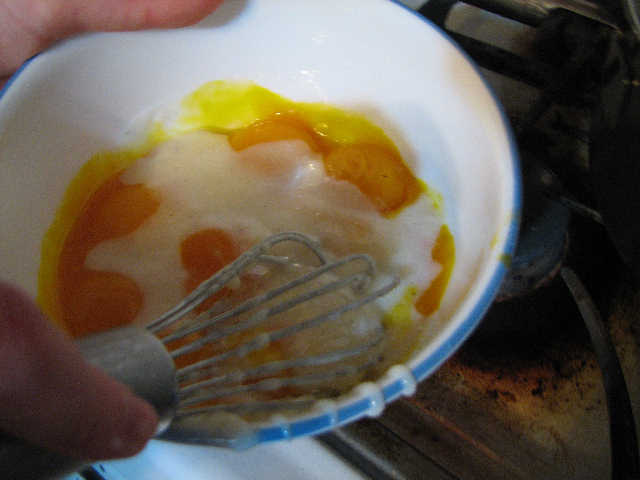
Put sugar, flour, and cornstarch in your pan, and whisk it together.
Whisk in your remaining 5 cups of milk until there are no lumps.
Cook over medium heat, stirring constantly, until thick and no longer has a raw, starchy taste (which can take up to 30 minutes).
If you cook it on high heat, it will thicken up too quickly and on the bottom first. That will leave with clumps of thick filling on the bottom, and loose, soupy filling on the top. This can usually be remedied with lower heat and vigorous whisking, but it’s best to just avoid it in the first place and cook it on a lower heat. This was a time I had the heat on too high (I forgot my front burner was hotter than typical), so I found the filling thickened before the starchy taste was gone. I continued to cook it, over low-heat, till it didn’t taste so raw. I whisked in my remaining cup of milk/vanilla beans at this point, because I didn’t want to keep the vanilla beans that hot for so long; I’m thinking the flavor might not be that sturdy.
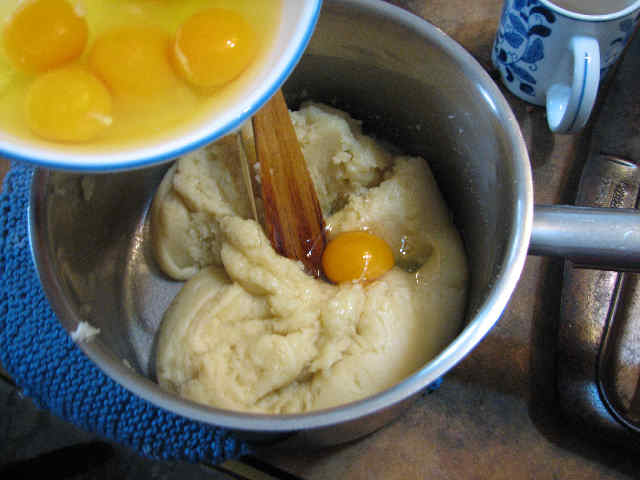
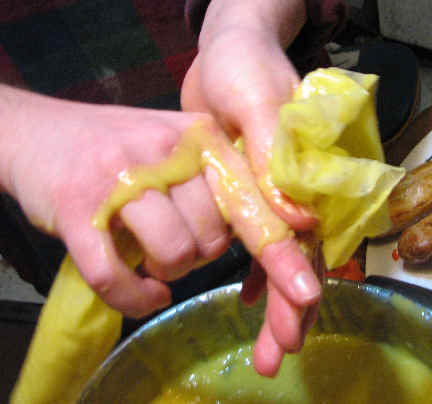
Next you need to add the egg yolks. This whole beautiful dozen of eggs needs to be separated,

like this.
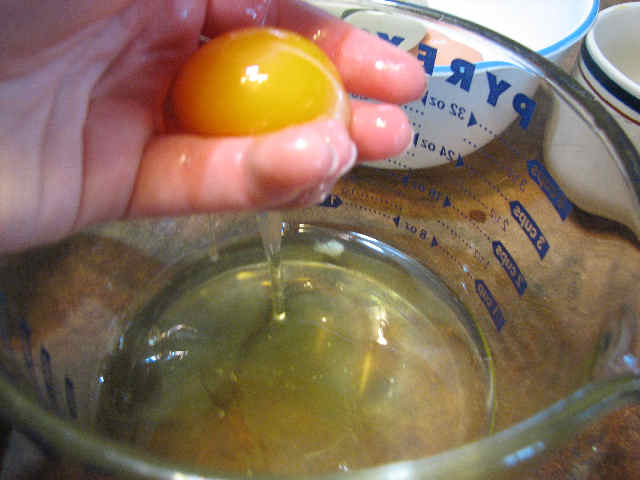
Some people use the shells, some people use fancy gadgets, but I’ve found hands work the best. First crack your egg into a small tea-cup, so if the yolk decides to split open on you, you can just set that contrary egg aside and try again. Then dump the whole egg into your hand, and let the white slip through your fingers. You’ll be left with nothing but a slimy yolk in your hand, which you then dump in your yolk bowl. You’ll have so many egg whites left over you can make an angel food cake, if you’re dutiful.

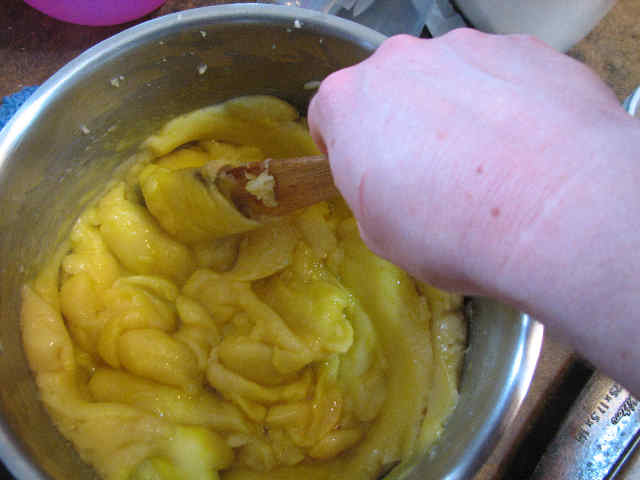
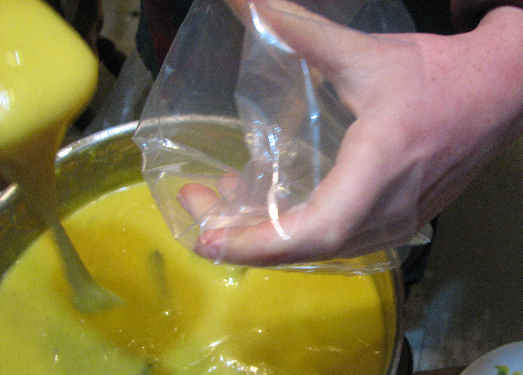
The eggs need to be tempered before you add them to the hot milk mixture, otherwise you get scrambled yolks in milk, not a thick, rich custard. The yolks can’t be dumped in cold, they must be warmed up before adding them to hot milk. This is accomplished by spooning some of the hot filling into the yolks, and stirring well.
I do that several times, until the bowl begins to feel warm in my hands. Then rapidly whisk the yolk mixture into the milk mixture.
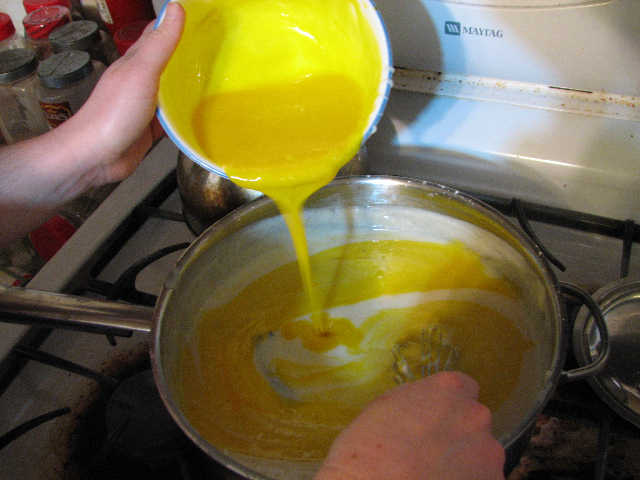
Add the butter in, too, and keep stirring till it’s melted in.
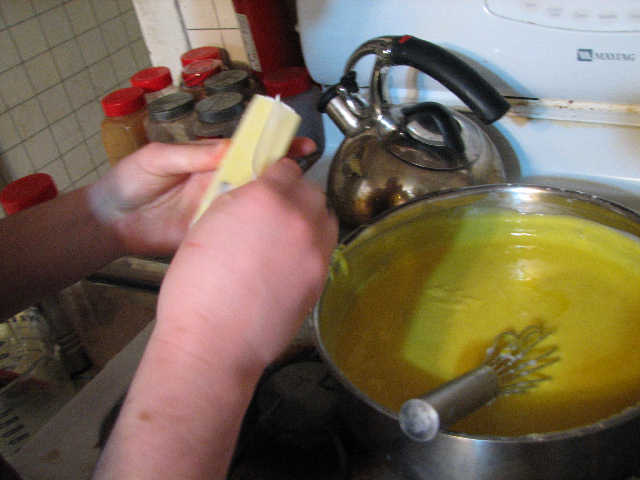
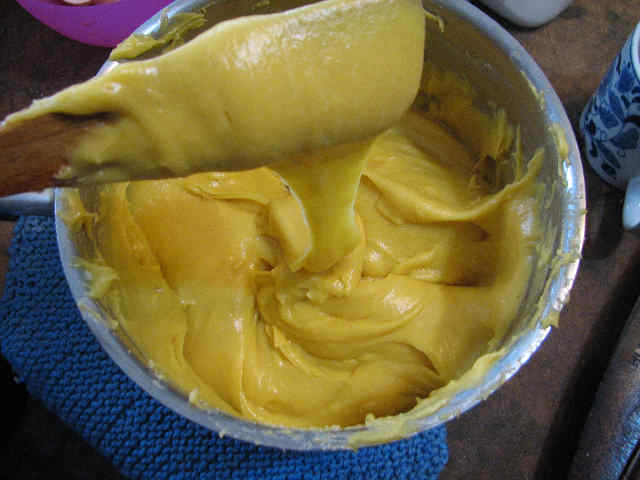
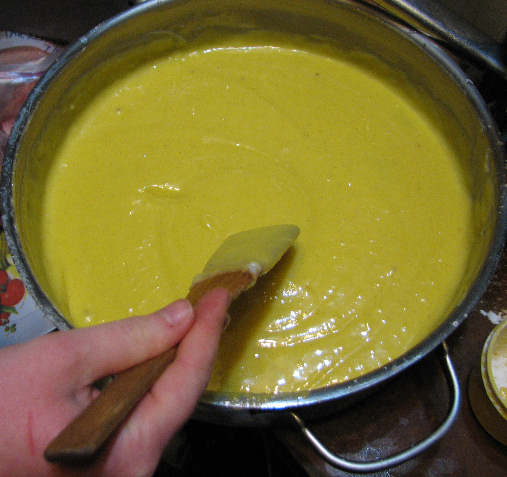
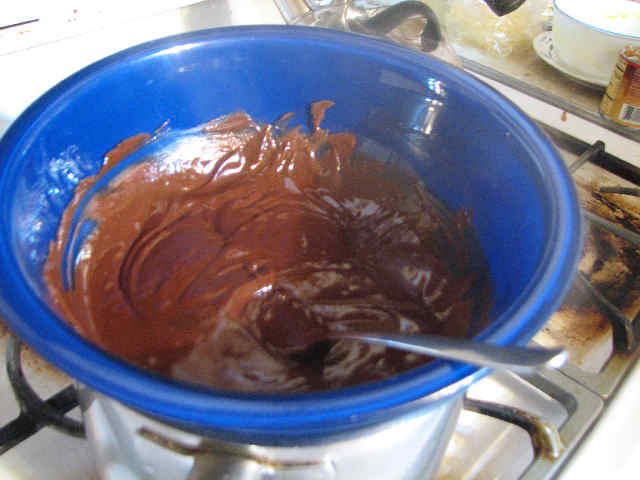
The finished custard:
Glaze:
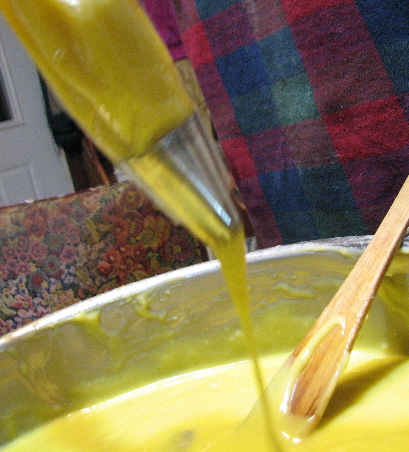
I set up pan with water in the bottom and a glass bowl on top to make my own double boiler. The water underneath the pan should be simmering.
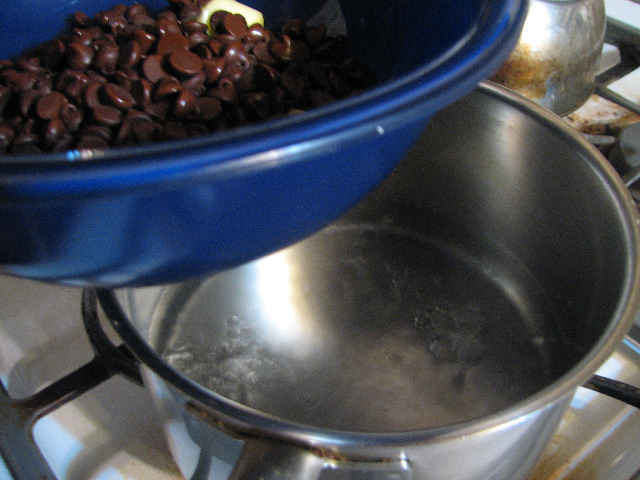
Then I just melt chocolate as needed, in a ratio of 1/2 cup chocolate chips to 2 TB butter. I think I used about 2 cups of chocolate chips and a stick of butter, but I can’t remember.
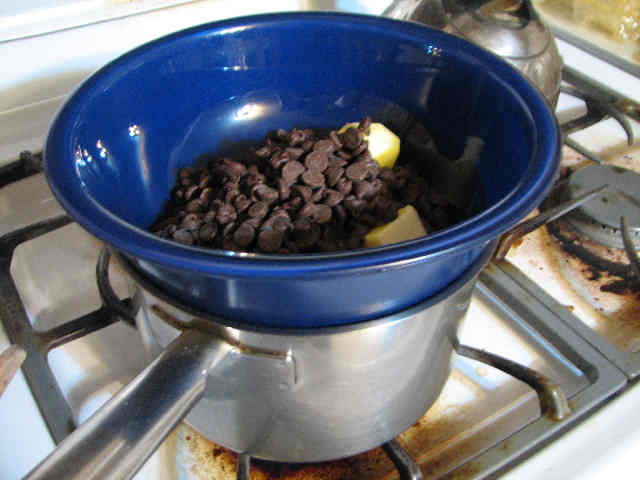
It should melt until totally smooth, with no lumps.
Assembly:
Set-up your pastry bag with a large tip (star or round, it doesn’t matter), and load it with completely chilled filling. Here I’m using a disposable pastry bag.
If it isn’t cold enough, it will slip right through your tip without any pressure, leading to a filling where you want it and where you don’t—in other words, all over the place.
(I left the soupy-filled eclairs on the below-freezing porch while I filled the rest, and also kept my soup custard on the porch between refilling my pastry bag. The colder the custard got, the easier it was to manage, and by the time I finished all filling all the eclairs, the soupy-filled ones had firmed up nicely.)
The steam has made the eclairs mostly hollow (you can break one open to see, or just take my word for it) but they can still have a few walls on the inside. I make two or three holes on the top (just break the holes with your finger), and stick the tip of the pastry bag into the holes. If there is no walls on the inside, you can usually see the filling squirting back up through the other two holes. If you don’t see that happen, you’ll need to fill each hole individually.
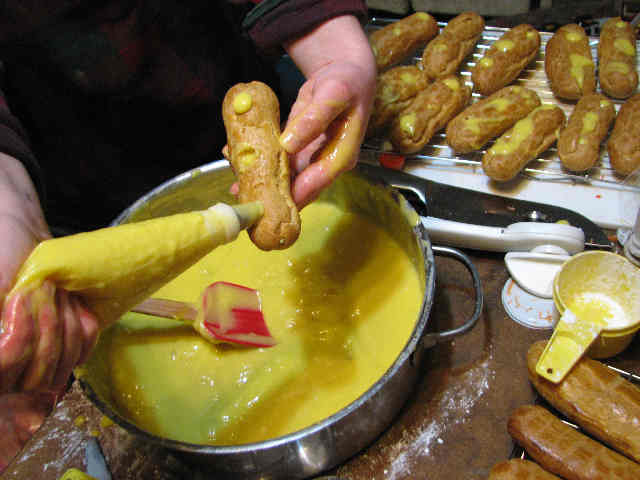
These holes get covered with a nice thick layer of glaze.
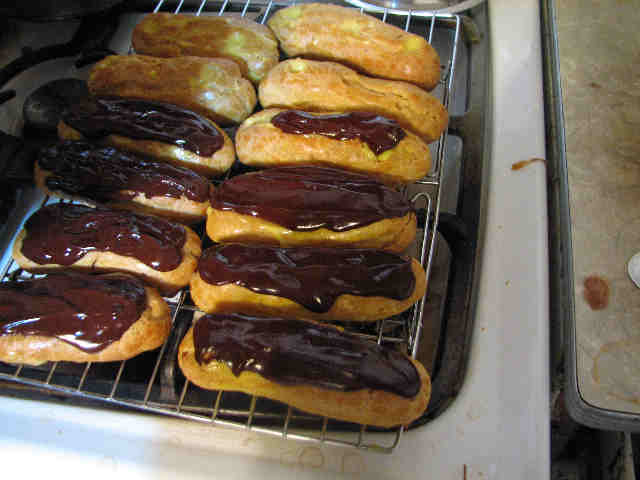
Endless eclairs. Your hours of work will be downed in a few short moments. Yum.

Posted in Uncategorized | 2 Comments »
My biggest and best secret for being a good cook is to only feed hungry people.
I kid you not. I suppose a lot of people think that the saying “Hunger is the best sauce” is a quaint old wives tale, or not really true, like how they used to say “Eat your mashed turnips–children in Africa are starving”. It sounds good and moralizing, but doesn’t really make sense. Well, for your information, it’s not a quaint old wives tale. The only reason why people (or, at the very least, Americans) think so is because they have so very rarely been hungry, if ever. O, they may have thought so. No doubt they even said the were starved, famished, and weak from lack of nourishment. No doubt they even believed it. But I sincerely doubt they had even begun to be hungry. More likely, they were simply no longer full. Which is nearly just as scandalous, I’m sure.
I find this double standard absurd: at wine tastings they will carefully spit out each mouth full of wine, so as not to actually ingest it, and so have their palate dulled by lack of appetite for wine. And yet, at fancy food tastings they don’t have everyone bike for half an hour before hand, or some other sort of mild but true exercise. Don’t they know that being even mildly hungry refines the tastebuds, making every flavor more full and defined? Don’t they know that an unhungry person can detect half as much subtlty as someone prepared to eat? Don’t they realize that all but the bluntest and most powerful flavors are wasted on those who have no need of food?
I’ve often wondered if that’s the reason that in fancy restaurants you can’t tell which things are supposed to be the food and which are supposed to be the decoration. Since people who aren’t really hungry can’t really taste, food of necessity gets judged by other standards. How does it look? Oo, the red looks so pretty next to the green. Look how small it is! Isn’t it just darling? How much does it cost? Ouch! Well, you know you’ve eaten good today.
No, you haven’t. You can’t eat “good” unless you need to eat.
Eating is practically America’s favorite pastime, and yet (or, perhaps, because of it) people have largely forgotten the whole purpose of eating. (Incidentally, they have also forgotten the meaning of the words “hungry” and “starving”. Starving takes a lot longer than you would think.) Eating is about satiating hunger. Eating is about filling what’s empty. Eating is about sustaining and cultivating life. You would never know that by watching their eating habits. There are the conscientious type, who obsess over counting calories. There are the food-y types, who believe in eating expensive food, no matter how gross it is. There are those who eat simply because it’s a thing to do, and not unpleasant. But none of them seem to realize that the best time to eat is when you’re hungry, and the best time to stop is when you’re not.
They cannot even begin to realize what they’re missing out on, because they haven’t been hungry. If they realized how much worse food tastes when you are simply shoveling it in to a mouth that doesn’t care—well, in all honesty, they probably wouldn’t do much different. Let’s face it, you can spit out a mouth full of wine without getting all sweaty–it’s just so much more a reasonable course of action. But not being able to discern tastes, they turn to the basest of instincts: salt, sugar, and fat. Needless to say, the conscientious type people therefore declare war on salt, sugar and fat. A pointless, and terribly faulty, argument. There is nothing wrong with salt, sugar and fat. The problem is that they eat when they are not hungry, and they don’t stop.
I pity the fancy-cook, who must try to find some way to amuse his mindlessly eating audience. He may have awards stacked up to the ceiling, but he has yet to actually cook, or have his work enjoyed. I pity the one who has been deluded into thinking the salt, sugar and fat they ingest by the handful is food, or tastes good. Addicting, yes, as the body reacts under it’s most base instincts, but not food. It cannot sustain or nourish life by itself. And it certainly does not attain to truly tasting good–it does taste, however, and if your senses are so dulled that almost anything that has a taste is said to have a good taste, you might think it meets the requirements.
To feed someone is to provide nourishment. To eat is to be nourished. If those before you are in no need of food, if you have no hunger that needs to be silenced—what is the point of food? It is diminished. It is a play thing. And your tastebuds are diminished. It is all still there, but it’s not being tasted, and it’s not being used.
Only cook for hungry people. Otherwise, it’s a waste of time. And food.
Posted in Uncategorized | 3 Comments »
When it comes to food, barbarians are a lot more picky than you might expect. In fact, food might be the one thing barbarians care the most about.
It has to be hot.
It has to have meat in it.
Fish is not a meat; it’s a vegetable.
When in doubt, add extra virgin olive oil, garlic, onions and tomatoes.
Peanut butter is a poison.
Meat is not to be consumed unless it’s dead.
Meat is not dead unless there is no pink in it.
Only one eating utensil is required: your hand. (Optionally, you can use either a spoon or a fork. A knife is out of the question; that’s what teeth are for.)
The four food groups are: beef, potatoes, gravy, and pie.
Barbarians have more than four food groups. Also included are: pasta, brownies, chicken and garlic.
The more a “food” is processed, the more it becomes like garbage. Fresh ingredients are always superior.
“Chewy” is a complement.
Pasta is always al dente.
Mayonnaise is gross.
Eggs are great. Favorite ways to prepare them include: brownies, chocolate eclairs, chocolate cream pies, pound cake, and other egg-rich pastries.
If that store-bought white bread really were made out of sawdust, it would probably be better. Don’t eat it.
Rice is neither vegetable nor starch; it is a non-food.
Cranberry sauce is a vegetable.
Ketchup is a vegetable.
Balsamic vinegar is good.
Alcoholic drinks are horrible.
You cannot have too much garlic.
Orange juice trumps soda, every time.
After dining, you don’t have to wipe your hands off on your clothing. You can always use someone elses.
Quiche is not even worth addressing. Even you know better than that.
Feta cheese is good.
So is mozzerella, extra-sharp cheddar, sharp cheddar, monterary jack, colby, colby jack, ricotta, and pepper-jack.
Cottage cheese is not good.
American cheese is not a cheese.
Potatoes taste good when cooked in duck fat.
Arugula is a weed.
Fresh spinach is good.
Store bought broccoli has almost no comparison to the vastly superior homegrown broccoli.
Cake mixes are kind of vile, and not really worth making.
Good applesauce is neither watery nor sweet.
If it has tentacles or looks like a bug or grub, it’s not food.
Excessive saltiness is gross.
Beans are a risky business; They can be edible, but they count as neither a starch nor a protein, so they are never anything more than accessories.
A soup is a simply a drink. If you’re trying to make a meal, it must be either a stew or a chowder.
Homemade is better.
They have many other such statutes and proverbs; but this is enough to get you started, should you ever have a horde of barbarians to feed.
Posted in Uncategorized | 4 Comments »