The goal this time was to test my belt fire kit and to see how long it would take me to get one liter of water to a rolling boil. Both things were tested with the creation of one fire but I am going to split out the discussion of the belt kit into its own section I don’t want the review of the Wazoo gear to get lost in the middle of the discussion of building the fire (which is where the discussion would naturally fall if I was strictly chronological).
Conditions: The temp was 29 degrees Fahrenheit when I was done the test. There was solid cloud cover and occasional ice falling from the sky. When I started, the sun was in the process of setting and by the time I was done it was dark. The proceeding week had been very wet as has been the pattern. It was so wet that there was standing water on the ground all around where I was trying to start the fire.

1st Test: Fire Starting With Belt Kit
Equipment Used: Wazoo 2″ long Ferro Rod paired together with a Wazoo Mini Ceramic Folder. Tinder used was a Wazoo Fire Plug.
Equipment Digression:
Every time I put on the belt I normally wear, I have the below with me.
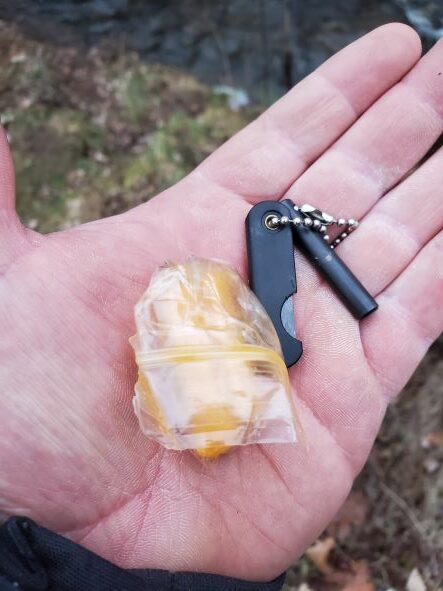
In theory, those small items should allow me to start a fire under just about any conditions. In practice I wondered from the time I got these items how hard it would be for me to start a fire with them. I have used Ferro rods to start fires before but never in bad conditions and never with such a small rod.
I acquired those items because I believe that a Ferro rod is the ideal backup fire starter for your bic lighter. It is a lot harder to break (and even if you broke it, it is possible to use the broken parts to start a fire). It is not impacted by the temperature and it is low effort way to start a fire compared to flint and tinder or a friction fire assuming you can even do such things. The downside is that it requires two hands and a little bit more coordination then either matches or a lighter. Also, your typical Ferro Rod that most people can use easily is bigger and bulker then a lighter and so it is hard to have with you unless you are carrying a backpack.
The small Wazoo rod solves the problem of Ferro rods being hard to carry but at what cost? A Ferro rod is not much good if you can’t make a fire with it…….
It was for this reason that I splurged on the Wazoo fire plugs. Given that I am a rookie and a smaller Ferro rod is harder to use I figured I would need every advantage I could. Since Wazoo Fire Plugs are what Wazoo normally pairs with their small Ferro Rods, I felt like they were my best shot at making the little rod work.
Narrative for the Fire Starting:
Since it was important that this fire get going fast as possible for the hypothermia drill, I put a little more thought then I have in the past into building the fire lay. And as normal when I put thought into things, I out smarted myself to a certain degree. The idea I had was to build a platform for kindling with some thumb size sticks as I have been doing in wet ground. But instead of using that platform as a place to light the tinder as I have done in the past, this time I piled the kindling up on the platform with two long sticks under it. My idea was that when I lit the tinder I would use the two stick to lift up on the kindling and stick the tinder under it. It was only when I went to light the tinder that I realized I now had no flat dry place to use as base for lighting the tinder.
This meant that I was using a very short Ferro rod for the first time on tinder that was balanced a bit precariously on top of pile of kindling. The fact that I got away with this at all is due to the fact that the little Ferro rod threw surprisingly good sparks. If the Wazoo fire plugs had worked as well for me as cotton balls do, it would have been a very uneventful fire starting.
It probably would have still been uneventful I had not tried to treat the fire plugs like they were cotton balls. With cotton balls I normally tear them open and light them up. So with the fire plug I just cut it open lengthwise with the little ceramic knife and tried to light it. It caught a little bit but would not stay burning and I accidently knocked it to the ground. It is possible at this point it got a little damp (as noted in the conditions section, the ground was extremely wet) and that might have made other attempts a little more difficult than they otherwise would have been.
After I failed to light it the first time, I took some time to fluff the fire plug out a little bit. I got it to catch but it did not stay lit. I disconnected the chain holding the striker and the Ferro rod together to make it easier to throw sparks but that did not change much as I was throwing pretty good sparks even with my freedom of movement constrained by the chain. It took some more futzing with the fire plug to make it fluffy enough to get the plug truly lit. Once the fire plug was going it had no problem lighting the kindling even though kindling was not ideal.
I don’t want to oversell the issues I had. It took me no more than 8 strikes and 3 or 4 minutes tops to get the fire plug burning. But it aggravated me because I felt like a cotton ball would have worked a lot better with less effort. So later when the fire was going strong I took a cotton ball out, tore it open and set it on some wet moss. It took two strikes to light and would have started on the first strike if I had aimed it better.
If you want to get a rough idea of what it was like for me to try to start these fire plugs, watch the first part of the below video by Luke from Outdoor Gear review (the ones he is using are a different brand then mine but I am pretty sure they are the same thing in practice).
Of course, he is working on a better surface so he did not knock it down like I did. He was also using a bigger ferro rod then I was using.
Time to Light Fire: I did not time how long it took to light the fire because it was part of larger drill that is explained further down this post. However, it did not take long.
Lesson Learned:
1. The small Wazoo fire rod works better than I expected and is certainly a valid emergency fire starter. I could teach a child to use one in five minutes as long as we were lighting cotton balls. The one thing I am curious about is why it works so well. I suspect that it might just be because I have done most of my Ferro rod practice using cheap Ferro Rods which are harder to strike. But it is possible that a ceramic striker works better then a steel one as Wazoo claims in their marketing (“We pioneered the use of ceramic in this type of application and you’ll never find a better material for the job. You’ll be replacing any standard-issue firesteel scraper in a flash”).
2. Cotton balls soaked in petroleum jelly are still the fire starters that I would want to use if in a stressful situation. Nothing else I have tried has worked so well for me with so little effort on my part.
3. More experimentation is needed to determine the value (or lack therefore) of the fire plugs. Most of my trouble came from trying to treat them like they were a cotton ball. Now that I know they require a little more prep, the will probably start for me first or second strike like they do for Jason below (the other guy with him is the founder/owner of Wazoo).
The question is what if anything does the fire plugs add to make up for the extra fuss needed over cotton balls? Do they have a longer burn time? Do they have more resistance to water when not protected by a plastic bag?
2nd Test: Hypothermia Drill
Equipment Used: A one liter single walled metal container and my Streamlight Microstream flashlight (only because the test went past dark). Fire kit was as described above.
Nature of the Drill:
The hypothermia drill as it was taught to me is simply timing yourself to see how long it takes to get 1 liter of water to a rolling boil in primitive conditions (it also involved building a quick tarp shelter but I skipped that part as I was focused on fire skills). You typically would not be bringing water to a boil to treat hypothermia unless you needed to purify it (even then, what matters more, getting warm water into the victim or worrying about what a virus might do to their body a couple of weeks out?). Also, trying to build a fire is not how most people recommend dealing with hypothermia (see disclaimer at the end). But this drill does provides a nice object standard by which to measure your ability to get a hot fire going without a lot of outside aids.
What you are allowed to use for this drill depends on how hard you want to make it and what you want to train on. Some people would require only found tinder to be used for this test but in that case they would often allow the use of fixed blade knifes and small folding saws. For this test, I had the artificial tinder as described above but I did not use a knife or saw to gather any of the wood. I wanted to practice building a hot fire fast without tools and did not have time to try to find dry tinder in wet conditions sans tools.
Time was started for this drill as soon as soon as I was done drawing the water from the stream.
Narrative for Hypothermia Drill:
The first challenge I faced was to find a flat spot still on my property near the stream that was not covered in standing water and was near enough evergreens to get a lot of dry wood fast. Once I located that, I started piling the wood at that spot. I tried to move with a purpose without running around like a crazed woodchuck because the surest way to mess up the Hypothermia Drill is to dump your water by knocking it over while trying to construct your fire lay.
If my memory of glancing at my watch when I started is right, I gathered all the needed fire wood in less than ten minutes. Not record breaking but not terrible for wet conditions and no tools to help you gather it. Starting the fire did not go as fast as I would have liked for reasons already described, but it did not take long either. I would have made good time except for the fact that I could not get the fire to spread horizontally at the speed I wanted it to.
To boil water really fast in a wilderness setting you need to surround your vessel completely with fire. If you only have one side facing the fire it will take a long time to boil even if you have large hot fire. On the other hand, if you have a smaller fire that completely encompasses your water container; you are going to get boiling water a lot faster. When you do this in warm weather with dry brush wood, all you need to do is start a fire and drop bunches of brush wood all around your bottle. The fire will race through the dry brush wood and you will have boiling water in short order.
But apparently when you have not so dry wood and very wet ground, the fire takes a long time to surround your water container no matter how much you coax it. It was only after I was all done that I realized how foolish I had been. Given the conditions, I should used the first fire to light three other fires surrounding the water container instead of trying to get the one fire to spread through the wood. I am pretty sure that approach would have worked a lot better then what I did.
Regardless, I did get the water boiling as the below picture shows and I did not spill it (always a plus for a klutz like me). I did get some crap in the water with all my constant futzing with the fire so I guess I lose style points for that. But it was sterile crap due to the rolling boil so I don’t know how much it would have really mattered.
Total Time Elapsed: 45 minutes.
Lessons Learned:
1. I need more practice making fire lays and not just with starting fires.
2. Sometimes it is more about making a bunch of small fires merging them rather than coxing one fire into doing what you want.
3. In icy conditions, check the entire length of the wood you think should be dry. Some of the longer branches that I thought were dry that I broke off the evergreens where actually covered in ice once they got far enough away from the mother tree. I did not discover that until I was throwing them on the fire.
Disclaimer: The above drill I am calling a hypothermia drill is not taught by anyone I know as a real “re-warming” drill. I have seen people with more experience than me dismiss starting a fire as a viable option on the grounds that it takes to long (“It will take you 30 minutes to get a small fire” was his claim). For me, this was more about seeing how fast I could get a hot fire going with little in the way of aids.
Below is a more conventional “re-warming drill”.